Showing posts with label #gluten-free. Show all posts

Saturday, July 18, 2015

Healthful Gluten-Free Waffles

Most of the waffles I have been making lakely have been with a mixture of protein powder and egg whites with with a pinch of baking powder thrown in...  they are really tasty, make up quickly, and have lots of protein... great on mornings when I am in a hurry to get moving.

But sometimes I like to take more time preparing a heartier breakfast... that often turns into brunch, really. That is the case with what I am calling my Healthful Gluten-Free Waffles.  'Healthful' because of the ingredients I have chosen to use in them.  And heartier because they kept me satisfied right through my normal lunch time.

I should also add that The Captain loved them... win win win!


NCN Ultimate Daily Cleanse


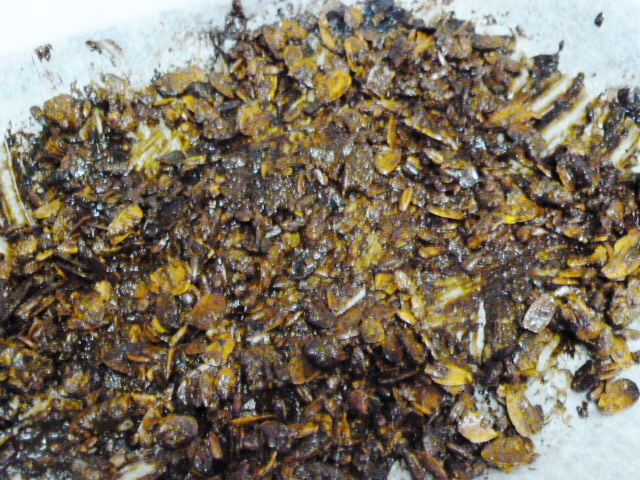
I have had a bag of North Coast Naturals Ultimate Daily Cleanse sitting in my pantry for several months now.  It was in the last shipment of goodies I received to test and I admit to being somewhat intimidated by it... not really knowing what to do with it. But, today, when I thought I would use some ground flax seed in my new waffle mixture, I decided to open that bag and try some of the Ultimate Daily Cleanse instead. I am so glad I did!

It is a mixture of six natural ingredients:
  • Ground 100% Canadian prairie flax seed (soluble & insoluble fibre & EFAs)
  • Ground psyllium seed husk (soluble & insoluble fibre)
  • Inulin fibre from chicory root (prebiotic fibre)
  • Ground organic sprouted chia seed (superior nutrients, fibre and EFAs)
  • Ground organic sprouted brown rice bran powder (soluble & insoluble fibre)
  • Probiotics (1 billion good bacteria cells from non-dairy lactobacillus fermentum; provides the same healthy probiotic goodness associated with yogurt, without the taste or the dairy)
And I should add that it is dairy free, soy free and wheat/gluten free as well.... an all-natural blend that promotes healthy regularity.  You can check it out at North Coast Naturals web site if you are interested.

Okay then...

So as to start out gently and ease into using it, I substituted 2 Tbs of the Ultimate Daily Cleanse for the 2 Tbs of ground flax seed that I would have used in this recipe.  I didn't notice any taste or texture whatsoever.

I used a bit of maple syrup, some banana slices and shredded coconut to dress up my waffles.... so delicious!


Healthful Gluten-Free Waffles


Healthful Gluten-Free Waffles
Makes 2 servings

  • 4 whole eggs
  • 1/4 cup unsweetened vanilla Almond Breeze
  • 2 Tbs Ultimate Daily Cleanse
  • 1/4 cup coconut flour
  1. Crack the eggs into a medium bowl and beat till fluffy.
  2. Add the rest of the ingredients and beat again till the batter is smooth. It will be lumpy. Keep beating.
  3. Pour half the mixture into a hot waffle iron and allow to cook about 5 minutes.
  4. Remove to plate. Cover to keep warm.
  5. Repeat with second half of batter.
  6. Serve with your favorite waffle toppings.
Per serving without toppings.
Weight Watchers P+ = 6.
Calories 232; Protein 15g; Carbohydrate 11g; Fat 14g; Fibre 8g.


Mix that batter
Keep mixing the batter till the lumps are gone!


Just cooked waffles
Cover the cooked waffles till all the batter has been used.


Dressed up waffles
And then dress them up before serving!


I did receive this product free of charge to use in my own kitchen and was under no obligation to review it.


What is your favorite way to get healthy fibre into your daily diet?

Friday, July 03, 2015

Cool Breakfasts for Hot Mornings

We are having an unusually warm Summer on the South Island this year. I am not complaining!

Actually I am enjoying every steamy degree on the thermometer... but I have certainly changed my eating habits in this heat.  I am not interested in my usual breakfast fare these days... eggs, pancakes, and even waffles are just not appealing.  I have been coming up with other things to enjoy as the temperatures soar... cold breakfasts are just better right now.

I like to select some fruit, occasionally nuts or seeds, some protein, a bit of cinnamon and sometimes stevia.  The combinations are endless.

Here are a few of my favorites so far... of course they are all gluten free.


Chocolate Cherry Smoothie

chocolate protein powder, unsweetened original Almond Breeze, frozen cherries
WWP+ = 4


Fruit and Seed Yogurt Bowl

fat free plain Greek yogurt, goji berries, hemp seeds, sunflower seeds, flax meal
WWP+ = 5

Cottage Cheese and Berries

fat free cottage cheese with thawed frozen mixed berries
WWP+ = 2


Egg White and Flax Muffins

egg whites, ground flax, cinnamon, stevia
WWP+ = 4
addition PPV for the cheese
I also like these slathered with PB2 or nut butter


Protein Pudding with Cherries

Greek yogurt, vanilla protein powder, thawed frozen cherries
WWP+ = 4


Chia Pudding with Yogurt and Berries


Chia Pudding with Yogurt and Berries

Greek yogurt, thawed frozen berries, chia pudding made with 2 Tbs chia seeds and 1/3 cup Almond Breeze.
WWP+ = 4


A couple of weeks ago, I even had a big kale salad!

What do you like to have for breakfast on a hot morning?


Wednesday, September 10, 2014

Kate’s Bright Green Lettuce Soup

Do you have any friends with whom you like to swap recipes and talk food?  One who gets as excited as you over a new find at Costco, or a new spice she has tried?  One who sends you flavored vinegars in the mail because she knows you will love them as much as she does?

Well, I do...  and I am so thankful for her.  My friend is Kate, and she has been the source of many of the recipes and ideas I have shared here with all of you.  When she told me about her Bright Green Lettuce Soup I thought it best to just turn things over to her.  And she is much, much too modest.

Here’s Kate's story:

I am so excited to be asked by my dear friend Elle to guest post on her blog! She’s very adventurous to ask a newbie to give it a whirl, don’t you think?

I have shared recipes with Elle in the past and frequently look for her input. About a year ago I started sharing photos of my creations so she could see what my end result looked like and compare her results to mine (hers are usually better!). So when I sent her the photos of this bright green soup she was very intrigued.

Getting back to the beginning. This year I purchased a half share CSA (community share agriculture). In my first delivery I received a HUGE bag of spring mix – the farmer calls it Spicy Mesclun Salad Mix. After eating it just about every day for lunch the first week, I still had 3/4 of a bag left and received another bag in the second delivery. {Picked up week’s 6 delivery, and there has been a bag of this Spicy Mesclun Salad Mix, each week.}

I was making chit chat with a patient (I am a mammographer) and was talking about gardening, and juicing. So I mentioned my CSA and my spring mix dilemma. She suggested making soup out of it and said David Rocco had a recipe for one.

Well, I couldn't find the recipe she mentioned but I perused these ones:
And this is what I came up with:


Kate's Bright Green Lettuce Soup

Bright Green Lettuce Soup
Serves 5

Ingredients:
  • 3/4 cup onion chopped (about 1 medium)
  • 3-4 cloves of garlic chopped
  • 1/2 Tbsp coconut oil (or oil of your choice)
  • 10 oz cleaned and dried spring mix
  • 900 ml Campbell's vegetable soup broth (or make you own)
  • 1/4 cup coconut milk (I found little 160 ml cans; about the size of tomato paste cans)
  • Salt & Pepper to taste
  • Parsley for garnish if desired
  • Chives for garnish if desired
  • Greek Yogurt for garnish if desired (this will add an additional element of creaminess)
Directions:
  1. Preheat the coconut oil in a heavy bottom soup pot.
  2. Add the onion and garlic and sauté until onions are soft and translucent.
  3. Add the stock to the pot, cover, and bring to a boil. Simmer, covered for 5-10 minutes to more fully cook the onions.
  4. Turn the heat down and add the lettuce, cook until wilted. About 3-7 minutes more.
  5. Remove from heat and carefully puree the mixture with an immersion blender, or cool completely and use a regular blender to puree.
  6. Return to heat and stir in coconut milk. (** You could use cream, sour cream, or yogurt).
  7. Ladle into bowls and garnish with parsley and chives.
Per serving without garnishes.
Weight Watchers P+ = 1.
Calories 47; Protein 1g; Carbohydrate 5g; Fat 3g; Fibre 2g.

It smells delicious as it is cooking!!

The verdict:

It’s kind of like a cream of spinach soup, but probably not quite as thick.

I brought some to work the next day to share with my co-workers and they all had positive things to say....tasty, refreshing, exotic were some descriptors they offered.

This is a tasty and healthy soup. You could add some red Thai chili if you would like some extra zing, or a touch of arrowroot powder/cornstarch to make it a bit thicker if you like (of course adding more spring mix would also thicken it.)

Oh, did I mention it freezes really well and keeps it bright green hue?


Kate's Bright Green Lettuce Soup2
Onions sauteed till translucent in the coconut oil.

 
Kate's Bright Green Lettuce Soup3
Mixed Spring Greens, washed and dried.

 
Kate's Bright Green Lettuce Soup4
Mmmmm.  Coconut milk.

 
Kate's Bright Green Lettuce Soup6
Puree the soup...

 
Kate's Bright Green Lettuce Soup7
till quite smooth.
 

Kate's Bright Green Lettuce Soup8
Freeze the leftovers if you like…

 
Kate's Bright Green Lettuce Soup9
The beautiful bright green color won’t disappear!


Have you ever made soup with lettuce?


Now what to do with the rest of the greens? Pesto perhaps?

Thanks so much to Kate for her lovely, delicous recipe, and for taking over the blog today... if you like this recipe won't you consider Pinning it or Tweeting it via @WeCanBegin2Feed. Thanks so much!

Monday, August 26, 2013

Squash and Blueberry Scramble

I love the harvest season… the transition from Summer to Fall… ‘cause it means there are just so many of my favorite foods readily available – local and fresh.

Two of them are berries and squashes… pretty much ANY kind of berries and ANY kind of squashes.  And I am alwasy trying to come up with new ways to eat them together.

I made this recently and absolutely loved it.  I know it is kind of strange but I assure you it is delicious.  And simple and quick.

I used leftover acorn squash but you could just as easily use butternut, or kabocha or delicata or even carnival squash… which I am sure I will soon!  I did use blueberries too – they work very well cause they don’t squish down too much when they are cooked, but if you have blackberries, by all means, use them!

I put a sprinkle of cinnamon into my scramble as it was cooking, but you could just as easily go savory with this mixture and sprinkle some crumbled bacon into it.... oh my, I just thought of that, and I am going to do it!

Aug 19 squash and blueberry scramble 006

Squash and Blueberry Scramble
Makes 1 serving
  • 1/2 cup cooked squash
  • 1/2 cup fresh blueberries
  • 1/2 cup egg whites (4 egg whites)
  • Dash of cinnamon
  1. Remove the squash from the shell and mash it a bit.
  2. Place a non-stick skillet over MEDIUM heat and add the egg whites, cooked squash and half the blueberries.
  3. Sprinkle with cinnamon.
  4. Cook till the egg whites are firm, stirring occasionally.
  5. Remove to plate and top with the remaining blueberries.
Per serving.
Weight Watchers P+ = 5.
Calories 199; Protein 15g; Carbohydrate 37g; Fat 1g; Fibre 8g.

Aug 19 squahs and blueberry scramble 001
Scoop the flesh from the cooked squash.  I love these little yellow acorn squashes.

Aug 19 squahs and blueberry scramble 002
Mash it up a bit.

Aug 19 squahs and blueberry scramble 004
Put half the blueberries into the pan along with the squash and egg whites.   I love cooked and warm blueberries!

Aug 19 squahs and blueberry scramble 005
Top the cooked scramble mixture with the rest of the blueberries before serving.


What are you loving right now that is in season and local to where you live?

Wednesday, November 21, 2012

#Gluten-Free Pumpkin Cookies


I haven't baked anything sweet for what seems like ages, and lately The Captain has been hinting that he would really like me to make some cookies.

I made these up because there was a cup of canned pumpkin in the fridge that I wanted to use up and thought they would fill his need for a sweet... well, they didn't quite, unfortunately. But I really like them so I am going to share them with you anyway.

They are not very sweet.  The Captain actually ended up putting a little dab of apricot jam on his and then he did enjoy them... and whilte the last few were baking I was thinking about how I could salvage them and I realized that they might really benefit from a bit of sweetened Laughing Cow Cheese.  So I did try that with a couple and it was quite delicious! 

One wedge of the cheese, sweetened with a bit of Stevia or Splenda will easily perk up 6 cookies.  I didn't include it in the N.I. but overall, it won't make much difference.


Gluten Free Pumpkin Cookies
Makes 22 drop cookies.
  • 1 cup almond flour
  • 1/2 tsp baking powder
  • 1/2 tsp baking soda
  • 1 tsp cinnamon
  • 1/4 tsp ground cloves
  • 1/4 tsp nutmeg
  • 1/4 tsp ground ginger
  • 1 egg
  • 1 cup canned pumpkin
  • 1/2 cup fat free milk milk
  • 1/4 cup honey
  1. Preheat the oven to 375° F.
  2. Mix all ingredients together in a large bowl and stir till combined.
  3. Using a Tbs measure spoon, drop the batter onto a parchment paper lined cookie sheet.
  4. Bake for 15 minutes or until golden brown.  You can bake a bit longer if you would like a crispier cookie.
  5. Remove to a baking rack and let them cool for 5 minutes or so before eating or a bit longer if you are adding the 'icing'.
Per cookie.
Weight Watchers P+ = 1.
Calories 44; Protein 2g; Carbohydrate 4g; Fat 3g; Fibre 1g.

Mix all ingredients together.
 

Drop onto parchment paper lined cookie sheet.
 

Bake for 15 minutes and allow to cool.


If you like, put a bit of sweetened Laughing Cow cheese on the top of each one.


Wednesday, October 17, 2012

Grain-Free Granola... Working the Skinny Rules

Several weeks ago I picked up some gluten-free granola from a vendor at our local community Saturday morning market. I like to support the local growers and bakers and craftspeople where and when we can.

It is fun to wander around the market on sunny Saturday mornings, and talk to the various stall-keepers, pet the neighborhood dogs, enjoy a cup of coffee and listen to some music, before heading home with whatever treasures and fresh produce and flowers we have found that day.

The granola was very good.... it was made with Bob's Red Mill certified gluten-free oats and I quite enjoyed it.  Granola is a rare treat for me because I usually choose to spend my calories and Weight Watchers Points Plus daily target on less calorie dense foods...

However, since I have been avoiding gluten, and eating fewer grains in general, I came across this recipe for grain-free 'granola' on Gabby's Gluten Free.  I Pinned this recipe some time ago and bought the ingredients to make it, and then promptly forgot about it.

Until now!

This week I am joining a group of my online Weight Watchers buddies in following Bob Harper's Skinny Rules.  In case you aren't familiar with him, Bob is a world famous celebrity trainer who has helped people lose masses amount of weight and get fit and healthier, on a reality TV show called The Biggest Loser, over the past several years.  He has produced many workout DVDs and written a couple of books, among a myriad of other accomplishments.

According to Bob, the most important Skinny Rule, is to avoid eating starchy carbs after 1 p.m.  I am finding it a bit tough so this grain-free granola is perfect, especially for a nut-lover like me!  The only ingredients are nuts, ground flax, almond butter, coconut oil and salt.  Very few carbs at all and lots of healthy fats.

I made up a half batch, according to Gabby's recipe, cooking it in my oven at 300° F (rather than the 350° F recommended) and stirring the mixture every 5 minutes.  It did brown a bit more than I expected even at the lower temperature, and I think this browning will depend on the kind of almond butter you use. 

It is delicious!  A couple of tablespoons in the afternoon over a chopped apple is a really filling and nutritious snack.  Oh yes, another Skinny Rule... eat apples every day!  I think a spoonful of Greek yogurt on top would be a nice addition.

 
I stored the leftovers in a sealed container in my refrigerator in order to keep the coconut oil and almond butter solidified and the granola crunchy.


Please visit Gabby's Gluten Free for the original recipe and instructions.  I have calculated the Nutritional Information based on the ingredients I used.

Per 2 Tbs serving.
Weight Watchers P+ = 3.
Calories 108; Protein 3g;  Carbohydrate 3g; Fat 10g, Fibre 1g.

I used already-sliced almonds and then chopped some walnuts.
 

I melted the coconut oil and almond butter together on low power in the microwave oven and then poured it over the nuts and cinnamon.
 

Stir to combine it all... and then bake.
 

When it comes out of the oven you need to let it cool completely for the almond butter and coconout oil to reset.
 

Add to a chopped apple for a perfect afternoon snack or even a dessert... where's the Greek yogurt?


Monday, May 21, 2012

Peanut Butter and Oat Ballz with Raisins... Mmmmm.

Happy Victoria Day to all of my Canadian friends.  This  has always been my favorite stat holiday as it is often on my birthday, which actually is May 24th... and now living in Victoria makes it even more special.  The annual parade is so fun... unfortunately this year the weatherman didn't cooperate!

The people we have been house and kitty sitting for since the middle of December came home yesterday.  Last Sunday, Mother's Day, we ran a half marathon, and on Monday we started moving our things into our own little nest... leaving the pantry pretty much bare of everything except the essentials I think we needed for the next several days.

But on Friday afternoon, I decided a treat was in order so I looked to see what I could come up with, and I found a few ingredients and put together some raw Peanut Butter and Oat Ballz.  Just the right sweet to enjoy out on the deck in the sunshine with an afternoon coffee.  If your oats are gluten free then these cookies will be, too.

I had chunky peanut butter on hand, but smooth would be fine, and you could use almond butter or sunflower butter too.  Just make sure it is at room temperature so it will blend easily with the other ingredients.

I used honey and liquified it in the microwave oven because I had already packed my agave nectar.

Store the leftovers in the fridge or the freezer so they will hold their shape.


Peanut Butter and Oat Ballz
Makes 13 ballz
  • 1/2 cup peanut butter at room temperature
  • 1/2 cup quick (not instant) oats
  • 2 Tbsp liquid honey
  • 1/2 cup raisins
  1. Mix all the ingredients together in a medium bowl until well-blended.
  2. Put the bowl into the fridge for a bout half an hour to cool the dough... it is easier to handle when cool.
  3. Using a scoop, or a melon-baller, or a spoon, portion the dough into ballz and roll in your hands to shape.
Per serving.
Weight Watchers P+ = 3.
Calories 100; Protein 3g; Carbohydrate 11g; Fat 5g; Fibre 1g.

Put all ingredients into a medium bowl.


Blend well and then refrigerate for about half hour.


Portion doug and roll into 13 ballz.


Chocolate chips would be good too!