Wednesday, February 28, 2018

Cauliflower Ham Waffles... Low carb and low fat too. Delicious!

For the past few months I have been doing a lot of experimenting with different kinds of foods, fine tuning my diet in order to find out how various foods and drinks affect me... my mood, my athletic performance, my sleep, my weight, and the amount of inflamation they cause.

Sadly, I have discovered that red wine affects me quite negatively... I do not sleep well, and I get cramping in my legs during the night that even an evening dose of magnesium no longer prevents.

On a positive note, I have also discovered that a low carb, even to the point of being in ketosis, agrees with me very well.  I thrive on healthy fats... avocado, nuts and nut butters, cream and oils... coconut, avocado and olive are my favorites.  I love making my own nut butters. I like leafy green and crunchy veggies... and the occasional bit of fruit. I do not miss grains and grasses and as much as I do like the taste of them, I am not missing squashes and beans.  I do occasionally have a high carb dayl.. perhaps a bit of sushi or some edamame and a Starbuck's specail coffee, and then happily get right back on a low carb regimen the next day.  It is all good. I am happy and in a groove. 

This morning I was wanting something substantial for breakfast and knew that I had a bit of riced cauliflower in the crisper that needed to be used or tossed soon, so I put together these Cauliflower Ham Waffles pretty quickly.

They are low carb, and actually low fat too.  I did add some sugar free syrup on top before I ate them, but next time I think I will go the savory route and add a bit of salt and them some sriracha or even salsa.  If you are a keto enthusiast, add some avocado or olive oil to the mix.

I have been purchasing cauliflower already riced... but if you have a head of cauliflower, break a few florets off and put them in your blender or food processor and whizz till they are broken down into large rice shaped crumbles.

Cauliflower Ham Waffles by @WeCanBegin2Feed

Cauliflower Ham Waffles

Makes 1 serving.

Ingredients:
  • 85g (3 oz.) riced cauliflower - approximately 1 cup
  • one large fresh egg
  • 2 slices extra lean deli ham
Instructions:
  1. Place cauliflower rice in a medium microwave bowl (I used a glass measure cup) and cook on HIGH in mike for 3 minutes.
  2. Remove from mike and allow to cool for a few minutes.
  3. Turn on waffle iron and allow to get hot. I use a nonstick spray in mine.
  4. Add egg to cauliflower.
  5. Cut ham into small pieces and add to cauliflower.
  6. Combine cauliflower, egg and ham and pour mixture into waffle iron.
  7. Cook about 5 minutes till outside is crispy and browned, and remove to plate.
  8. Top as desired.
Per serving without toppings. *
Weight Watchers Freestyle Smart Points = 1.
Calories 146
Fat 6g
Saturated Fat 2g
Sugar 2g
Protein 18g

* The nutritional information for the ingredients I used.  Yours will depend on  your own ingredients.

Cauliflower Rice
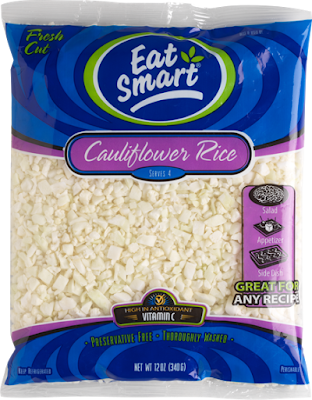
This is the cauliflower rice I am currently using. I am including this picture to illustrate the size and shape that the cauliflower rice crumbles will look like if you make your own in a blender or food processor. Picture is taken from the Eat Smart web site.

Cauliflower Ham Waffles
Mixture in waffle iron before cooking. You can see that it is fairly thick and not runny so does not make a mess in the waffle iron.


Cauliflower Ham Waffles
Waffles slightly browned, and ready to easily remove from waffle iron.


Cauliflower Ham Waffles
Waffles are plated and ready to top... or even eat just as is.  Enjoy!


What do you think?  If this is something you might enjoy, I hope you will consider sharing or Pinning!


Friday, October 20, 2017

Roasted Red Pepper and Tomato Soup

Ah, Fall. I have such mixed feelings about the change of seasons.  Let's see... I really don't like that the days are getting shorter and cooler.  And I am not happy about the rainy days we are having right now either, even if we really need the rain after the unusually hot and dry Summer we enjoyed!  On the other hand, I do love that some of my very favorite things to eat are more readily available and more reasonably price with the onset of the Fall harvest.

One of these favorite things is red peppers!  And when they are on sale at my local market, I buy a huge bagful and always roast some almost immediately. I love them sliced up on salads, and in omelets, on burgers, and especially in home made soups.  Today I am sharing a quick and easy way to put together a lovely one... Roasted Red Pepper and Tomato Soup.

It is just a matter of roasting the peppers and then pureeing them with a can of diced tomatoes.  If you are not sure how to do this, I have included a link to a little tutorial about it in the first recipe instrucion (which also has another delicious soup recipe).  It is so easy... just takes a bit of time.  You can season  your soup with basil and oregano, or leave plain and just add some salt and pepper. As is, it is vegan but if you don't care about that, you can  make it a little fancier and even company-worthy with the addition of a sprinkle of grated parmesan cheese.  It is truly delicious!

You might enjoy this soup as a first course at dinner, or as your main course at lunch. I have even slurped a bowlful as an afternoon snack.    Yes, the best part about Fall is definitely homemade soup!

Roasted Red Pepper and Tomato Soup by @WeCanBegin2Feed


Roasted Red Pepper and Tomato Soup
Makes 4 servings, approximately 1 cup each

Ingredients:

  • 3 red peppers
  • 1 28-ounce can (798 ml) diced tomatoes
  • salt and pepper to taste
  • dashed of basil and oregano (optional)
Instructions:
  1. Roast red peppers and allow to cool before removing seeds and skin.
  2. Place the peppers in a large bowl along with the tomatoes.
  3. Puree the veggies with immersion blender and pour into to saucean to heat.
  4. Warm soup to desired temperature over MEDIUM heat on stovetop.
  5. Remove to serving bowls and season.  Garnish as desired.
  6. Leftover soup may be stored in refrigerator for a couple of days or frozen.
1 serving, without garnish
WW SP = 0 (vegetables are 0 SP foods so nothing to count here)
Calories 70
Saturated Fat 0g
Carbohydrates 14.1g
Fibre 3.6g
Sugars 5.1g
Protein 2.6g


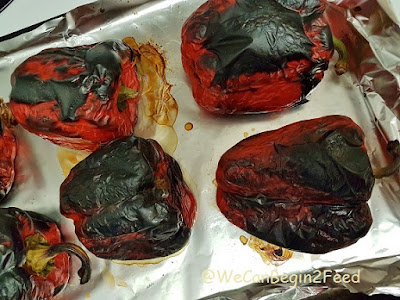
Red Peppers on baking sheet
I always make a few extra, for omelets, burgers, salads...  yum!


After seeding and removing the skin.


Season with salt and pepper, and a bit of dried basil and oregano if you like them.


A bit of shredded parmesan cheese adds a lot of flavor and only a few calories.

Are you a fan of roasted red peppers, too?  What is your favorite way to enjoy them?


Friday, June 30, 2017

Berryful Freezer Pops Coming Right Up!

These berryful freezer pops are a perfect treat for Canada Day or the 4th of July celebrations... especially if it is a hot sunny day in your neighborhood.  I first made them a few years ago when I won some new freezer pop molds in a giveaway from spabettie and wanted to try them out with something special and new.  I have used the molds a lot since then, but this recipe is still one of our favorites.  It is a great way to cool down on a hot Summer day.

They do take a few hours to set up so if you can, make them the day before you want to eat them.

These molds hold a total of 3 cups.  If you plan to make some pops for yourself, you will want to measure your molds and then adjust the amounts of the ingredients accordingly.  When I made them, I didn’t put enough water in the food processor, so I just added some more to the mixture once it was in the molds and then stirred it a bit.


Berryful Freezer Pops


Berryful Freezer Pops

Ingredients:
  • 2 cups frozen berry mixture (blueberries, blackberries, raspberries, strawberries)
  • 1-1/2 cups water
  • bit of Stevia (this is optional of course)
Instructions:
  1. Place water and berries into a heavy-duty blender and process until smooth and thick.
  2. Pour into freezer pop molds and freeze overnight.
Mine came out to about 23 calories each… and of course they are zero Smart Points for my Weight Watchers buddies. 

Of course you could use any fresh berries that you find in your local markets instead of frozen. I know there are still strawberries and raspberries and blueberries in my area.

How do you celebrate your national holiday?