Wednesday, October 31, 2012

Choice and Chewy Apple Chutney

Many years ago, back in the pre-sailboat years, we had a lovely garden and a huge kitchen where we spent many happy hours canning and preserving the harvest we gathered every Fall.

We picked berries to make jams, and crabapples and rosehips to make jellies; we chopped veggies to make antipasto; we made cucumber and bean pickles; we canned fruit, and I made pear chutney.  I loved that pear chutney, and it has been on my mind for the last several weeks now... whenever I bite into a lush ripe pear, I recall the chewy raisins and the sweet and sour flavors.  The cloves and other spices smelled so lovely as it cooked away on the stove.

So, when recently I saw a recipe for apple chutney in a local grocer's newsletter, I decided to give it a try... it called for currants, which I don't really care for, and mint, too, which just didn't sound right to me... so after making a few little tweaks to the ingredients, I came up with this Apple Chutney.  Apples are so plentiful and such a great price right now.

The chutney is delicious!  And the kitchen smelled wonderful while it was cooking, too.  It is particularly nice along side some roast pork or baked chicken, and also swirled with a bit of cream cheese on a cracker.  I also served it as a side dish on a piece of baked Carnival squash... Mmmmm.  I hope you will give it a try. 


Apple Chutney
Makes 3 cups (12 servings of  approximately 1/4 cup each)
  • 1/3 cup raisins
  • 1/3 cup finely chopped onion
  • 1/2 cup unsweetened apple juice
  • 1/3 cup apple cider vinegar
  • 3 Tbs brown sugar
  • 2 tsp grated fresh ginger root
  • 1/4 tsp salt
  • 1/2 tsp ground cumin
  • 1/4 tsp cinnamon
  • 1/8 tsp red pepper flakes
  • 1/8 tsp ground cloves
  • 3 medium to large apples
  1. Halve and core each apple and then cut into 1/4-inch chunks..
  2. Place them in a heavy-bottomed saucepan with all of the other ingredients.
  3. Set the pot over MEDIUM-HIGH heat and bring to a light boil.
  4. Lower the heat and allow the mixture to simmer till the apples are tender and the chutney thickens slightly, about 20 minutes.  Stir occasionally.
  5. Remove from heat and allow to cool to room temperature .  It will thicken as it cools.
  6. Cover and refrigerate chutney till ready to serve. 
  7. It can be frozen if you are going to keep it for any length of time or you could preserve in sterilized glass jars using a basic hot water canning bath.
Per serving of 1/4 cup.
Weight Watchers P+ = 1.
Calories 49; Protein 0g; Carbohydrate 13g; Fat 0g; Fibre 1g.


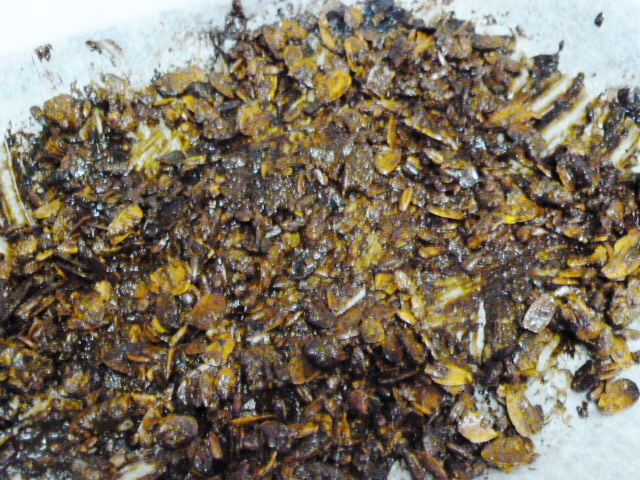
Dice the apples fairly small.
 

Add the other ingredients and cook on simmer.
 

The apples will get soft and the broth will reduce and thicken a bit.


Sweet and sour, such a tasty delight!
 

Monday, October 29, 2012

Banana Omelet... Bazinga!

Are you one of those people who likes to eat the same thing for breakfast every morning?  Eggs and toast, or hot oatmeal, or a bowl of cereal with milk and fruit?  I know that some find it very comforting to not have to make that decision every morning... especially if it is hectic with getting ready to head out to work or to school.

Not me... I am always on the lookout for something new.  I have lots of favorite breakfast foods but that doesn't stop me from trying new ones... very often!

I do like my breakfast to have lots of protein, though.  A starchy, carb-laden breakfast just doesn't get my day off to a very good start.  Usually within an hour, or perhaps two at the most, I am hungry again, and if I don't get something substantial to eat at that point I get shaky and light-headed and hangry!   I am likely to eat the first thing I see.

So, when I first started adding fruit to my omelets several weeks ago, I thought bananas migh be a good idea.  I love eggs in the morning, but I do need a break from eating veggie-ful omelets, as much as I love them.  And I have made omelets with cooked apples and cinnamon, so why not banana omelets? 

I played around with ingredients a couple of times until I came up with a combination I really like. So does The Captain... which is very nice because I really thought  he would not like this at all.  So, when I make this, I have to double the ingredients and use 2 pans because I am making an omelet for each of us.

I like to top our omelets with the other half of the banana and some chunky natural peanut butter.


Basic Banana Omelet
Makes 1 serving
  • 1/2 banana, mashed
  • 2 whole fresh eggs
  • 1/4 cup egg whites
  1. Mash the banana in a medium bowl.
  2. Add the eggs and the egg white and beat well.
  3. Pour the batter into a heated skillet that has been coated with non-stick spray.
  4. Cook about 3 minutes until bubble start to form.
  5. Cover and leave till eggs are cooked through, about 5 minutes more.
  6. Fold in half and then remove to plate.
  7. Serve with your favorite toppings.
Per serving, without toppings
Weight Watchers P+ = 5.
Calories 234; Protein 19g; Carbohydrate 16g; Fat 10g; Fibre 1g.


Mash half of a banana.

Add the eggs, and egg white, and beat well.

Pour batter into heated skillet.

Once the edges start to dry and bubbles form, cover and let continue to cook.

Fold in half, remove to plate, and then top.


Friday, October 26, 2012

Banana Protein Cake

We have found a wonderful new breakfast!  A Banana Protein Cake... created by She Rocks Fitness,  a blog I recently discovered and am now following.  Please stop over and read the post about how this dish came to be!

I altered the ingredient list only slightly and then doubled the amounts to make us one cake each.  It was an enormous serving!  I topped our cakes with a mixture of chunky natural peanut butter and fat free plain yogurt.  And, although delicious, it was actually too much and even after a two-hour walk, we were not ready for lunch till well into the afternoon!


The texture of these cakes is wonderful!  Chewy, yet light. 


We both wanted to try this again the next morning because we liked it so much!  But I made a single cake and cut it in half for us to share.  Then I topped it with fat free plain yogurt, a few banana slices and some blackberries... all sprinkled with cinnamon. 


This was definitely a better way to go... Still very filling and delicious, but not too much food all at once..

I am sure you could use your own favorite protein powder and  milk in this recipe and it would work out just fine. 

The original has cocoa powder added to it, too, so the next time I made it, I used chocolate protein powder and left out the cinamon... wonderful!

With yogurt and heated fresh blackberries.


I bet this would make a great little dessert or afternoon snack.  And of course, if your protein powder is gluten-free, the final result will be, as well.  I know that those of you who are Weight Watchers will love this cake!

I calculated the N.I. with the ingredients I used, and will share them for the whole cake as well as half of it.

Banana Protein Cake
Makes 1 cake
  • 1 mashed banana
  • 1 scoop vanilla protein powder
  • 1 egg
  • dash of cinnamon
  • 2 Tbs vanilla unsweetened Almond Breeze
  • 1 Tbs chia seeds
  • 1/2 tsp baking powder
  1. Beat all ingredients together and allow to sit for a few minutes till chia seeds begin to swell.
  2. Pour batter into a microwave safe dish which has been lightly coated with a non-stick spray.
  3. Cook on HIGH for 3 minutes, checking after the 2nd minute that the batter is not rising too high and running over the edge of the baking dish.
  4. Remove from mike and let rest 4 or 5 minutes.
  5. Remove cake to serving dish and top as you like.
Per serving of whole cake, without toppings.
Weight Watchers P+ = 11.
Calories 353; Protein 37g; Carbohydrate 36g; Fat 16g; Fibre 9g.

Per serving of 1/2 of the cake, without toppings.
Weight Watchers P+ = 5.
Calories 177; Protein 18g; Carbohydrate 18g; Fat 8g; Fibre 4g.

Let it rest after cooking, for a few minutes.


Add your favorite toppings and enjoy!


Wednesday, October 24, 2012

Fresh Tomatoes.. Ah, So Delicious

Over the past couple of years we have been lucky enough to house-sit for folks who have had lovely yards with big flower and/or vegetable gardens... with free licence to  help ourselves.
 
We moved these plants to keep them in the sunshine all day long.
 

And loved eating the fresh and juicy tomatoes they produced.


And in doing so, we both have come to really appreciate freshly picked tomatoes!  Is there anything that tastes better?

I have grown a few herbs on the boat over the past several few years but had really forgotten how much I loved to garden and grow our own food and flowers.

That's why, when we decided to move off the boat this year and find an urban flat, we knew we needed either a patio or a balcony where we could have a container garden for herbs and flowers and strawberries and tomatoes.... this week we picked the last of the tomatoes, still green, and put them away in paper bags to ripen.
 
But, for the past few months, it has been an absolute joy to go outside and pick perfectly ripe tomatoes at will, bring them in to wash them, and then greedily devour them!  Succulent, juicy, sweet, and perfectly sumptious tomatoes.
 
 
One planter of full size yellow tomatoes and one of red cherry tomatoes.
 
 
It was so exciting to see the fruit growing...
 
 
and I had quite forgotten we had chosen a yellow variety until they started to ripen.
 
 
In our part of the country, yellow tomatoes are quite expensive at the market, so I guess I must have decided to try growing them ourselves when I saw the plants at the garden shop... I honestly cannot recall this - just too much going on at the time I think, with setting up the new apartment, the impending half marathon, and getting the house we were looking after in tidly shape to turn over to the owners.  I was quite excited when I realized we were growing yellow tomatoes.... for some reason this variety has virtually no waste... such a small and sweet core with very few seeds.  Lovely!
 
 
We have enjoyed them on salads.
 
 
Many times.
 
 
And it is nice to be able to go out and pick just a few...
 

to dress up an omelet.
 
 
We have so enjoyed getting back to gardening this year, even if on a very small scale,  and I can't wait to see what next Spring brings to us.
 
Here is one of my favorite ways to use and enjoy fresh tomatoes...


Are you a gardener?  Flowers or veggies or both?
 
What is your favorite kind of tomato?


Monday, October 22, 2012

Apple Cinnamon Omelet - A Twist on a Classic

As much as I love eggs and omelets and frittatas, I do get a bit bored with them. Sometimes my tastebuds just don't want tomatoes, and onions, and peppers, and spinach.

But I do like to have eggs for breakfast because I know they will keep me satisfied throughout a busy morning, till lunchtime rolls around... even if I run or workout or spend the morning shopping or doing housecleaning.

Recently I decided to try something different with our omelets, and thought I would sweeten them up a bit with some apples, cinnamon and almond butter... it was a successful experiment and I will be doing more of this I am sure.

You could easily halve the ingredients and make this for one, or make up the whole thing and refrigerate half of it for another meal. I think it would make a good lunch too, with a fruit and nut salad, perhaps.

The Captain thought that the filling was a bit dry and so would like it with jam!  And of course that would add a bit more sweetness (and calories) as well.  We will work on that for him.


Apple Cinnamon Omelet
Makes 2 servings
  • 4 eggs
  • 1/4 cup egg white
  • 1 apple, cored, pared and diced
  • 1/2 to 3/4 tsp cinnamon
  • 1 Tbs almond butter
  1. Mix the eggs and egg whites together in a small bowl.
  2. Pour the mixture into a heated skillet that has been coated with non-stick spray over MEDIUM heat.
  3. Cover and cook till the eggs are set and look dry on the top, about 5 or 6 minutes.
  4. Meanwhile, stir the apple and cinnamon together in a microwave safe dish and mike on HIGH for 2 minutes, to soften the apple pieces.
  5. When the eggs are cooked, loosen the edge all around with a spatula.
  6. Dot the almond butter and spread it over 1/2 of the omelet.
  7. Spoon the cooked apple pieces over the almond butter.
  8. Fold the omelet in half.
  9. Cut it into 2 pieces and set each piece on a serving plate.
  10. Sprinkle with more cinnamon before serving.
Per serving.
Weight Watchers P+ = 6.
Calories 250; Protein 17g; Carbohydrate 14g; Fat 14g; Fibre 3g.

Diced apples mixed with cinnamon in a microwave safe dish.
 

Cooked till soft.
 

After omelet has set, spread almond butter over 1/2 of it.  The Captain thinks jam would be good here, too.
 
 
Cover the almond butter with the cooked dices apples and cinnamon mixture.
 

Cut into 2 portions and plate, sprinkling a bit more cinnamon over the top.


A lovely flavor and a nice change of pace.


What do you think? Would you like fruit in your omelet? 
 
What other fruits might work in this way?  I am going to try some bananas next.
 

Friday, October 19, 2012

Butternut Squash and Quinoa Chili

A few weeks ago I saw a headline on the front of a women's magazine that read Butternut Squash and Quinoa Chili and I quickly turned to the page to read the recipe.

I was kind of disappointed but thought the idea was a good one, overall. I had never thought to put either butternut squash or quinoa in a chili before so I went to work and created my own.  We have eaten it as I made it, and a few days after I first made this, I mixed some leftover cooked chicken breast into a serving and heated it up and it was delicious!

It freezes nicely... and as with most chilis, the peppery flavor gets stronger as it sits.  I didn't overdo the chili pepper as The Captain doesn't like it too spicy, so add the larger amount, or even more, if you like it hot!


Butternut Squash and Quinoa Chili
Makes 6 servings, 1-1/2 cups each.
  • 1 Tbs olive oil
  • Butternut squash, peeled, seeded and cut into cubes, about 14 ounces in weight
  • 1 medium onion, peeled and diced
  • 4 cloves garlic, peeled, smashed and minced
  • 1 green pepper, seeded and cut into chunks
  • 1/2 cup raw quinoa
  • 1 can red kidney beans, rinsed and drained, about 2 cups
  • 1-1/2 cans diced tomatoes, about 42 fluid ounces
  • salt and pepper to tasted
  • 1-1/2 to 2 Tbs chili pepper
  • few red pepper flakes, optional
  1. Heat the oil in a large saucepan over MEDIUM heat.
  2. Saute the onion and garlic until they are translucent, about 10 minutes.
  3. Add the butternut squash and green pepper, and saute another 5 minutes.
  4. Add the quinoa, beans, tomatoes and seasonings and bring to a light boil.
  5. Cover with a lid, and reduce heat. Simmer for 30 minute.
  6. Serve hot.
Per serving.
Weight Watchers P+ = 6.
Calories 245; Protein 9g; Carbohydrate 45g; Fat 4g; Fibre 10g.

Steaming on the stovetop, before covering and allowing to simmer for 30 minutes.
 

Freezing leftovers in single servings.
 
Delicious and nutritious!
 

With some cooked chicken breast chunks mixed in.


Wednesday, October 17, 2012

Grain-Free Granola... Working the Skinny Rules

Several weeks ago I picked up some gluten-free granola from a vendor at our local community Saturday morning market. I like to support the local growers and bakers and craftspeople where and when we can.

It is fun to wander around the market on sunny Saturday mornings, and talk to the various stall-keepers, pet the neighborhood dogs, enjoy a cup of coffee and listen to some music, before heading home with whatever treasures and fresh produce and flowers we have found that day.

The granola was very good.... it was made with Bob's Red Mill certified gluten-free oats and I quite enjoyed it.  Granola is a rare treat for me because I usually choose to spend my calories and Weight Watchers Points Plus daily target on less calorie dense foods...

However, since I have been avoiding gluten, and eating fewer grains in general, I came across this recipe for grain-free 'granola' on Gabby's Gluten Free.  I Pinned this recipe some time ago and bought the ingredients to make it, and then promptly forgot about it.

Until now!

This week I am joining a group of my online Weight Watchers buddies in following Bob Harper's Skinny Rules.  In case you aren't familiar with him, Bob is a world famous celebrity trainer who has helped people lose masses amount of weight and get fit and healthier, on a reality TV show called The Biggest Loser, over the past several years.  He has produced many workout DVDs and written a couple of books, among a myriad of other accomplishments.

According to Bob, the most important Skinny Rule, is to avoid eating starchy carbs after 1 p.m.  I am finding it a bit tough so this grain-free granola is perfect, especially for a nut-lover like me!  The only ingredients are nuts, ground flax, almond butter, coconut oil and salt.  Very few carbs at all and lots of healthy fats.

I made up a half batch, according to Gabby's recipe, cooking it in my oven at 300° F (rather than the 350° F recommended) and stirring the mixture every 5 minutes.  It did brown a bit more than I expected even at the lower temperature, and I think this browning will depend on the kind of almond butter you use. 

It is delicious!  A couple of tablespoons in the afternoon over a chopped apple is a really filling and nutritious snack.  Oh yes, another Skinny Rule... eat apples every day!  I think a spoonful of Greek yogurt on top would be a nice addition.

 
I stored the leftovers in a sealed container in my refrigerator in order to keep the coconut oil and almond butter solidified and the granola crunchy.


Please visit Gabby's Gluten Free for the original recipe and instructions.  I have calculated the Nutritional Information based on the ingredients I used.

Per 2 Tbs serving.
Weight Watchers P+ = 3.
Calories 108; Protein 3g;  Carbohydrate 3g; Fat 10g, Fibre 1g.

I used already-sliced almonds and then chopped some walnuts.
 

I melted the coconut oil and almond butter together on low power in the microwave oven and then poured it over the nuts and cinnamon.
 

Stir to combine it all... and then bake.
 

When it comes out of the oven you need to let it cool completely for the almond butter and coconout oil to reset.
 

Add to a chopped apple for a perfect afternoon snack or even a dessert... where's the Greek yogurt?


Monday, October 15, 2012

Pumpkin Protein Pancakes... It's the Season!

It's pumpkin season!  I couldn't resist making my flourless whey protein pancakes with canned pumpkin instead of mashed banana this morning. 

They were wonderful!  And while I was in the kitchen, cooking away, The Captain was checking his email in the bedroom and he called out to me about the lovely aroma coming from the kitchen.

Give them a try... and perhaps use pumpkin pie spice in place of cinnamon for even more flavor!  And use your favorite protein powder.... I know that soy or egg will work well here too.

I served them with a bit of maple syrup... Mmmmm.  Fall in Canada, yup!  I used to make 4 pancakes out of this batter but now I just make 2 larger ones.  It gets breakfast on the table faster.


Flourless Whey Pumpkin Protein Pancakes
Makes 2 servings
  • 2 scoops vanilla whey protein powder
  • 1/2 cup egg whites
  • 2 Tbs vanilla unsweetened Almond Breeze
  • 2 Tbs ground flax seeds
  • 1 tsp cinnamon
  • 1 tsp baking powder
  • 1/2 cup canned pumpkin
  1. In a medium bowl, mix the protein powder, egg whites, Almond Breeze, flax seeds, canned pumpkin, and cinnamon
  2. Stir until well combined. The mixture should not be too thick... add a tsp or 2 of water if it is.
  3. Coat a saucepan with non-stick spray and set over MEDIUM heat. Pour 1/2 of the mixture into the warm pan and spread till it is a circle about 7 - 8 inches in diameter.
  4. Let cook several minutes. You will see a bit of bubbling from underneath and the batter should lose its shine as it cooks. Leave till most the shine is gone and then gently flip over. Cook a couple of minutes more.
  5. Remove pancake to a plate and cover to keep warm.
  6. Cook the second pancake in the same manner.
  7. Top with your choice of syrup to serve.  

Per serving, without topping.
Weight Watchers P+ = 5.
Calories 211; Protein 32g; Carbohydrate 10g; Fat 4g; Fibre 4g.

Mixing up all the ingredients.
 

Look at the color of the raw batter.
 

And the cooked!


Nice fluffy texture.  Yummo!


Do you love pancakes too?