Showing posts with label onions. Show all posts

Saturday, February 07, 2015

Roasted Cauliflower and Onions with Parmesan Cheese

I love cauliflower!  My Mother would be so proud of me if she knew that.  I would never eat it as a child without a gallon of milk to wash down each bite,though, and because my Father didn’t care for it either, she never  served it at home. I use it in a variety of ways to make grain free pizza crust, tortillas, flatbreads, rice, and in soups and stews... but hardly ever just as side dish.  For some reason I have been craving it lately.  This Roasted Cauliflower and Onions with Parmesan Cheese, which has lots and lots of garlic, too, is truly delicious.  I might even get The Captain to try it!  The cheese interests him a lot.

I have used coconut oil instead of my usual olive oil here in roasting these veggies. I am making an effort to use more coconut oil in my cooking these days and this is a natural fit.

You cannot imagine how good the aroma coming from kitchen was as this baked away in my oven! I wish I could capture that and share it with you!  The whole, smashed cloves of garlic in this dish smell just wonderful as they cook.  And yes, my windows are still open wide, long after removed the pan from the oven.

I calculated the N.I. for this dish as 4 servings, but honestly, I could easily make a meal of this just for myself!  And if you like really cheesy, by all means... add more!

A word of caution here… don’t slice the onions too thin or they will just disappear as they bake.  I like to leave them at least 1/2 inch in width.

Roasted Cauliflower and Onions with Parmesan Cheese

Roasted Cauliflower and Onions with Parmesan Cheese
Makes 4 generous servings
  • 1 large head cauliflower
  • 1/2 medium to large white onion (cut it in half vertically)
  • 6 cloves garlic, peeled and smashed
  • 1 Tbs coconut oil
  • Dashes of salt and pepper
  • 1/3 cup shredded parmesan cheese 
  1. Preheat your oven to 400°F.
  2. Wash the cauliflower and remove its core and leaves. Break it into flowerettes and place them in large bowl.
  3. Slice the onion vertically and place the pieces in the bowl with the cauliflower.
  4. Add the peeled and smashed garlic cloves to onions and cauliflower and toss altogether.
  5. Drizzle the coconut oil over veggies and mix well.
  6. Pour it all into a roasting pan and sprinkle with salt and pepper.
  7. Place the pan in the oven and bake for 20 minutes.
  8. Remove the pan from the oven, and stir veggies. 
  9. Place the pan back in oven and bake for another 20 minutes.
  10. Remove the pan from the oven and sprinkle the veggies with the parmesan cheese.
  11. Place the pan back in the oven for a final 20 minutes.
  12. Remove from the oven. 
  13. Serve warm or cooled.

Per serving.
Weight Watchers P+ =  3.
Calories 132; Protein 7g; Carbohydrate 16g; Fat 6g; Fibre 6.

Roasted Cauliflower and Onions 1
Mix all the veggies together in a large bowl and drizzle with coconut oil.


Roasted Cauliflower and Onions 2
Sprinkle with salt and pepper before placing the pan in the oven.


Roasted Cauliflower and Onions 3
After 20 minutes, remove from oven, stir vegetables, and then replace in oven for another 20 minutes before sprinkling with parmesan cheese and baking a final 20 minutes.


Roasted Cauliflower and Onions 4
Serve hot from the oven, or allow to cool and store in fridge till ready to serve.  Reheat in microwave or eat cold… great either way!


Roasted Cauliflower and Onions 5
Mmmmmmm!


What is  your favorite way to eat cauliflower?


Wednesday, December 03, 2014

Cranberry Pulled Pork in the Crockpot

When the outside temperatures get nippy, I love to get out my crockpot. I am not sure why I equate slow cooking with cooler weather, but I sure do.  I not only used it one day this last week to prepare this Cranberry Pulled Pork, but also the next… to cook up a turkey carcass that was in the freezer for Homemade Turkey Broth to make soups and sauces over the next few weeks.  I should actually have made that broth first, then I could have used it in this recipe!

I have always loved pork with fruit… apples, peaches, and yes, cranberries.  The flavors just go so well together.  This Pork Medallions with Apples and Cranberries is an old favorite. 

This time I decided to leave out the apples and just go with cranberries.  It is lovely and the balsamic vinegar gives just enough sweetness to the dish.  I was tempted to add garlic, but am glad I didn’t.

I used a lean pork loin roast that weighed just over 2 pounds. If you find a nice tenderloin, just reduce the amount of the other ingredients. It’s not rocket science, and you can’t really go wrong here.

I like to make a dish like this and then freeze it in individual or family-size portions so that I can put dinner together quickly on days I am working, or when I just don’t really feel like cooking much.  If you like, add some potatoes or rice, or just a vegetable or a salad, and you have a hearty and delicious meal.

Cranberry Pulled Pork in the Crockpot4

Cranberry Pulled Pork in the Crock Pot
Makes 14 four-ounce servings
  • 2-lb pork loin roast, trimmed of all fat
  • 1 cup onion slices
  • 1 cup chicken or turkey broth
  • 12 ounces fresh or frozen cranberries
  • 1/4 cup dark balsamic vinegar
  • 2 or 3 tsp dried oregano
  1. Lightly coat the inside of your crockpot with a non-stick spray or oil spray to make cleaning up easier.
  2. Brown all the outer edges of the pork roast in a saute pan over MEDIUM-HIGH heat for a few seconds. This is to seal in the juices so don’t skip doing this step.
  3. Spread the onion slices over the bottom of the crock pot, followed by the cranberries.
  4. Place the browned pork roast on top. and then sprinkle with the dried oregano.
  5. Pour the broth over the top of the roast, followed by the balsamic vinegar.
  6. Cover and let simmer on LOW for up to 8 hours.
  7. Remove the lid, and turn the heat OFF.
  8. With 2 forks, slowly pull the roast apart, mixing in the broth and the cranberries as you do.
  9. Measure out 4 ounces of the mixture for each serving.
Per serving.
Weight Watchers P+ = 3.
Calories 121; Protein 16g; Carbohydrate 4g; Fat 4g; Fibre 1g.

Cranberry Pulled Pork in the Crockpot

Cranberry Pulled Pork in the Crockpot1

Cranberry Pulled Pork in the Crockpot2


What’s your favorite crockpot meal?

Sunday, September 14, 2014

Bacon and Tomato Sauce


Doesn’t everything just taste better with bacon on it?
 
I don’t eat regular pasta anymore, preferring zoodles or spaghetti squash strands over wheat flour or even brown rice noodles.  But The Captain does like his pasta so I threw this together for lunch on Tuesday after we came home from the tennis court.

I was hungry, and hoped this might be quick. I already had some zoodles prepared and waiting in the fridge, so I put some water on to boil for The Captain’s linguine noodles while I made this sauce. It all came together in about 20 minutes.

I always keep some cooked, crumbled bacon in the freezer. It is just so handy to add a spoonful or two for a little flavor boost.  I also keep peeled garlic cloves in the fridge, too. If you don’t have crushed tomatoes on hand, use diced, or even fresh.. and you could also use your immersion/handheld blender to puree them if you like.

Bacon and Tomato Sauce

Bacon and Tomato Sauce
Makes 2 servings.
  • 1 tsp olive oil
  • 2 cloves garlic, peeled, smashed and minced
  • 3/4 cup white onion, finely diced
  • 1/4 cup cooked and crumbled bacon
  • 1 cup canned crushed tomatoes
  • 1/4 tsp red pepper flakes
  • salt and pepper to taste
  • fresh or dried basil for garnish and flavor punch
  1. Warm the olive oil in a skillet or saucepan over MEDIUM heat.
  2. Add the garlic and onions and saute about till softenened but not browned, about 7 or 8 minutes.
  3. Add the bacon and mix.
  4. Add the tomatoes and red pepper flakes and mix again. Allow to heat through.
  5. Remove from heat and then ladle sauce over noodles of choice on serving plates. Garnish and season before serving.

Per serving, sauce only.
Weight Watchers P+ = 3.
Calories 132; Protein 8g; Carbohydrate 10g; Fat 7g; Fibre 2g.

Printable Recipe

If you like this recipe, won't you please consider Pinning it? Thanks so much.

Wednesday, September 10, 2014

Kate’s Bright Green Lettuce Soup

Do you have any friends with whom you like to swap recipes and talk food?  One who gets as excited as you over a new find at Costco, or a new spice she has tried?  One who sends you flavored vinegars in the mail because she knows you will love them as much as she does?

Well, I do...  and I am so thankful for her.  My friend is Kate, and she has been the source of many of the recipes and ideas I have shared here with all of you.  When she told me about her Bright Green Lettuce Soup I thought it best to just turn things over to her.  And she is much, much too modest.

Here’s Kate's story:

I am so excited to be asked by my dear friend Elle to guest post on her blog! She’s very adventurous to ask a newbie to give it a whirl, don’t you think?

I have shared recipes with Elle in the past and frequently look for her input. About a year ago I started sharing photos of my creations so she could see what my end result looked like and compare her results to mine (hers are usually better!). So when I sent her the photos of this bright green soup she was very intrigued.

Getting back to the beginning. This year I purchased a half share CSA (community share agriculture). In my first delivery I received a HUGE bag of spring mix – the farmer calls it Spicy Mesclun Salad Mix. After eating it just about every day for lunch the first week, I still had 3/4 of a bag left and received another bag in the second delivery. {Picked up week’s 6 delivery, and there has been a bag of this Spicy Mesclun Salad Mix, each week.}

I was making chit chat with a patient (I am a mammographer) and was talking about gardening, and juicing. So I mentioned my CSA and my spring mix dilemma. She suggested making soup out of it and said David Rocco had a recipe for one.

Well, I couldn't find the recipe she mentioned but I perused these ones:
And this is what I came up with:


Kate's Bright Green Lettuce Soup

Bright Green Lettuce Soup
Serves 5

Ingredients:
  • 3/4 cup onion chopped (about 1 medium)
  • 3-4 cloves of garlic chopped
  • 1/2 Tbsp coconut oil (or oil of your choice)
  • 10 oz cleaned and dried spring mix
  • 900 ml Campbell's vegetable soup broth (or make you own)
  • 1/4 cup coconut milk (I found little 160 ml cans; about the size of tomato paste cans)
  • Salt & Pepper to taste
  • Parsley for garnish if desired
  • Chives for garnish if desired
  • Greek Yogurt for garnish if desired (this will add an additional element of creaminess)
Directions:
  1. Preheat the coconut oil in a heavy bottom soup pot.
  2. Add the onion and garlic and sauté until onions are soft and translucent.
  3. Add the stock to the pot, cover, and bring to a boil. Simmer, covered for 5-10 minutes to more fully cook the onions.
  4. Turn the heat down and add the lettuce, cook until wilted. About 3-7 minutes more.
  5. Remove from heat and carefully puree the mixture with an immersion blender, or cool completely and use a regular blender to puree.
  6. Return to heat and stir in coconut milk. (** You could use cream, sour cream, or yogurt).
  7. Ladle into bowls and garnish with parsley and chives.
Per serving without garnishes.
Weight Watchers P+ = 1.
Calories 47; Protein 1g; Carbohydrate 5g; Fat 3g; Fibre 2g.

It smells delicious as it is cooking!!

The verdict:

It’s kind of like a cream of spinach soup, but probably not quite as thick.

I brought some to work the next day to share with my co-workers and they all had positive things to say....tasty, refreshing, exotic were some descriptors they offered.

This is a tasty and healthy soup. You could add some red Thai chili if you would like some extra zing, or a touch of arrowroot powder/cornstarch to make it a bit thicker if you like (of course adding more spring mix would also thicken it.)

Oh, did I mention it freezes really well and keeps it bright green hue?


Kate's Bright Green Lettuce Soup2
Onions sauteed till translucent in the coconut oil.

 
Kate's Bright Green Lettuce Soup3
Mixed Spring Greens, washed and dried.

 
Kate's Bright Green Lettuce Soup4
Mmmmm.  Coconut milk.

 
Kate's Bright Green Lettuce Soup6
Puree the soup...

 
Kate's Bright Green Lettuce Soup7
till quite smooth.
 

Kate's Bright Green Lettuce Soup8
Freeze the leftovers if you like…

 
Kate's Bright Green Lettuce Soup9
The beautiful bright green color won’t disappear!


Have you ever made soup with lettuce?


Now what to do with the rest of the greens? Pesto perhaps?

Thanks so much to Kate for her lovely, delicous recipe, and for taking over the blog today... if you like this recipe won't you consider Pinning it or Tweeting it via @WeCanBegin2Feed. Thanks so much!

Wednesday, August 06, 2014

Simple Summer Salad

It is hot here this Summer!

The great thing about that, aside from enjoying the sunshine and blue sky, it makes me want to eat a bit less, and a lot lighter.

This simple Summer Salad is an old favorite. I can remember my Mother making it for the family on hot Summer nights.  I have been enjoying it ever since.  It is simple and nutritious, and quite pretty, too.  It can be made several hours ahead if you like, and kept cold. It is a great picnic take-along too. Make up a big batch; just keep it on ice till it’s time to eat.

I love the crunchiness of the veggies, and the small zing of the white vinegar is just the right touch for this light and cool side dish.


Summer Salad 


Summer Salad
Makes 2 servings
  • 1 medium tomato, core removed, sliced
  • 4 or 5 very thin slices of white onion. separated into rings
  • 1 small cucumber, sliced very thin
  • 2 tsp olive oil
  • 4 Tbs white vinegar
  • Dashes of salt and pepper
  1. Layer the veggies in a bowl and season with salt and pepper.
  2. Mix the olive oil and white vinegar together in a small bowl and spoon over the veggies.
  3. Refrigerate at least 20 minutes.
  4. Stir and refrigerate another 20 minutes.
  5. Divide into 2 small serving bowls and serve cold.

Per serving.
Weight Watchers P+ = 1.
Calories 63; Protein 1g; Carbohydrate 6g; Fat 5g; Fibre 1g.

Summer Salad 001
Layer the prepared veggies in a wide bottomed bowl.


Summer Salad 002
Sprinkle salt and pepper on them.


Summer Salad 003
Spoon the marinade over the top.


Summer Salad 004
Stir part way through the cooling process to make sure all veggies are being coated with marinade.  If you are leaving refrigerated for a few hours, do this a couple more times.


Summer Salad 007
Divide into serving bowls and enjoy!


What’s your favorite simple Summer salad?

If you like this recipe, won’t you please consider sharing this post on Twitter via @WeCanBegin2Feed and Pinning it, too?

Saturday, November 02, 2013

So What is Goop?

I have been asked this question several times since I posted about making Goop last weekend during my batch cooking marathon!   What is Goop?

I first hear the term GOOP when I met The Captain many years ago… at that time he made a one-skillet dish, based on ground beef, onions, and other veggies… and called it Goop.  Sometimes we used it as the filling in in a baking powder biscuit pie crust with cheddar cheese lattices, and sometimes he enjoyed it with macaroni noodles.  The vegetables varied, depending on what we had on hand, and we used a bit of tomato sauce to hold it all together.

We basically gave it up when we moved aboard our sailboat in 2002 and I completely forgot about it.  Till about a week ago.  We have been eating extra lean ground beef more often this past year and I am always trying to come up with new ways to serve it.  I was going to make up a Meat Sauce to serve with pasta and spaghetti squash, and I remembered Goop.

The main difference between Goop and a Meat Sauce, is that Goop is not seasoned or spicy, and it has only a bit of tomato sauce… much thicker than Meat Sauce.

Here is how it went the last time I made it… and you can see The Captain enjoyed a serving of barley alongside.  You can keep your meal gluten-free or Paleo quite easily.

Goop

Goop
Makes 4 servings
  • 1 Tbs coconut oil
  • 1 pound extra lean ground beef
  • 1/2 medium onion, thinly slices (about 7.5 ounces)
  • 4 cloves garlic, peeled, smashed and minced
  • 4 medium carrots, cut into small pieces
  • 1 medium red pepper cut into small chunks
  • 8 green beans, cut into 1/2-inch lengths
  • 3/4 cup tomato sauce
  1. Melt coconut oil in large skillet over MEDIUM heat.
  2. Add ground beef, onions and garlic.  Cook, stirring occasionally until the meat is fully browned and the onions are soft and translucent, 10 to 15 minutes. 
  3. Add the carrots, peppers and beans. Cook another 5 or 6 minutes till somewhat soft.
  4. Add the tomato sauce and stir to combine. 
  5. Cover and allow to simmer for half an hour. You may need to reduce heat to LOW.
  6. Divide into 4 and serve.  Season with salt and pepper if desired.
Per serving.
Weight Watchers P+ = 8.
Calories 310; Protein 25g; Carbohydrate 17g; Fat 15g; Fibre 5g.

Please note that in Canada our extra lean ground beef may be up to 15% fat. In the U.S. it may be a low as 4% so this will affect the N.I.  And you could certainly get more, but smaller, servings from  these ingredients.


3 Goop 1
Steaming away on the stove.. almost ready to add the tomato sauce and then cover.


4 Goop 2
And ready to serve. You can see how thick it is.


7 Good and Squash
I like mine with some kind of squash… or even a cauliflower tortilla to scoop it up.


What d’ya think?  Could you be a Goop fan, too?

Saturday, August 24, 2013

Squash and Sweet Potato Crustless Quiche

I first saw this intriguing dish when my friend Sara pointed it out on Facebook a short while back. The author at paleOMG calls it Spaghetti Squash Breakfast Bake.  I call it Squash and Sweet Potato Crustless Quiche.  Who cares?  It is AWESOME!

I Tweeted the link and highlighted is a favorite so I would be sure to be able to find it again… sometimes this is quicker for me than Pinterest.

The recipe itself is a fun twist on a crustless, cheeseless quiche, and the prose that accompanies it is witty and irreverent.  You may want to read it for the humor alone.  And drool.

I finally got around to making this dish a few days ago.  I admit, there is a fair amount of preparation involved.  I miked the spaghetti squash while shredding the sweet potato and onion in my food processor.  (I had never used the shredder blade before.  Who knew it could be so easy?)  At first I thought I would only need 6 eggs, but at the last minute whisked in 2 more.   And I didn't use a 8X8 pan as apparently I no longer have one!


Before baking, it looked a bit soupy….


Aug 21 more casserole 001

And the final cooked result?

P-E-R-F-E-C-T-I-O-N 

Aug 21 casserole 002

Now to be honest, the ingredient list contains some of my very favorite items, so I was pretty darned sure I was going to love this dish.  And I do.  And so did The Captain, which was a huge bonus for me, too, as these are NOT some of his favorite ingredients…. but he did love the outcome.

Aug 21 casserole 001

Aug 21 casserole 003

We ate half for lunch the day I made it… then the other half for dinner a couple of night’s later.  I reheated it on a MEDIUM power in the mike for a couple of minutes… I was afraid that HIGH power might make the eggs rubbery. The Captain also thinks it would be good cold.

Aug 23 quiche 001

And just look at those tomatoes… grown on our balcony in containers!  Red and yellow cherry tomatoes. Mmmmmm.

Next time, I just may bake this quiche in my silicone muffin cups…. they would make handy snacks too!

By the way, it is also paleo, vegetarian, gluten free... all those good things!

The N.I. as I made it, for 1/4th of the whole:

Weight Watchers P+ = 6.

Calories 243; Protein 14g; Carbohydrate 16g; Fat 14g; Fibre 3g.

Give it a try.  Plan to spend some time at it.  Thoroughly enjoy the fruits of your labors.  And then send me a Tweet or come back and leave me a comment here, saying THANK YOU… it’s that good!

Are you a quiche fan?  What is your favorite kind?

Wednesday, May 29, 2013

Bacon and Egg Muffins

In preparation for starting another Whole30 Paleo Challenge today, I have been doing a lot of food prep the past few days.

If you you know anything about eating Paleo, you know that it takes planning and preparation… so that you have suitable things on hand to eat, especially for days that you are running short on time.

Yes, you can always throw together a salad and open a can of tuna to plop on the top of it… but you likely don’t want to live on salad… as much as I love salad, I don’t want to eat it 3 times a day either... no matter what the variations might be.

So, a couple of days ago, I made some Curried Coconut Sweet Potato Soup..

May 21 soup 006


and a large batch of Beanless Beef Chili

May 26 chili 001


This morning, I made some Bacon and Egg Muffins…

2013-05-29 001 001


and I have a couple of pork roasts with some apples and onions cooking in the crock pot right now, which will become Pulled Pork when done…

May 29 Pulled Pork 1

It is smelling pretty good around here right now!

I want to share these Bacon and Egg Muffins with you… over the years I have been privvy to some ideas shared by my Weight Watchers friends for easy and quick breakfasts.  Several of them make what they call ‘Breakfast Quiches’.  They mix eggs or egg whites with a variety of chopped veggies and then bake them in muffin cups.

These little quiches are very handy as they can be kept in the fridge for several days. They make quick breakfasts or easy snacks and they are portable and quite tasty.  They are easily reheated in the microwave oven.

But today I wanted something just a bit different, so I added some cooked bacon to the mixture…. they are delicious.  Now, I am sure that in a pinch, you could use pre-cooked bacon bits in these muffins and they would be fine… but I had some bacon in the fridge so I used that… they are truly delicious!

Change the proportions if you like to make more .. or add different veggies too, such as chopped peppers, zucchini, tomatoes, or spinach.

I used silicone muffin cups, set inside a muffin tin, so no other preparation was needed, but if you use a regular muffin pan, you may want to coat it with a non-stick spray.  I haven’t tried paper liners so cannot vouch for them.

And please don't be afraid of these recipes we label 'Paleo'... all it means is that the recipe will be grain free, dairy free and sugar free.  What's scary about that?


2013-05-29 001 003

Bacon and Egg Muffins
Makes 9 muffins
  • 6 slices bacon, cooked till crispy, then cut into small pieces
  • 6 eggs, beaten
  • 1/8 cup diced white onion
  • 1/2 cup kale, cut into small pieces 
  1. Preheat the oven to 350°F and prepare your muffin tins.
  2. Combine all the ingredients in a medium bowl.
  3. Spoon the mixture into 9 muffin cups, trying to make sure the proportions of bacon, eggs, and veggies are approximately the same in each.
  4. Bake for 20 minutes.
  5. Allow to cool a bit before removing the muffins from the pan.

Per serving of 1 muffin.
Weight Watchers P+ = 2.
Calories 72; Protein 5g; Carbohydrate 1g; Fibre 0g; Fat 5g.


I took the opportunity to bake an egg in each of the 3 empty muffin cups in my 12-cup tin.  I love Baked Eggs… give them a try too!

August 4 Baked Eggs 002


Sunday, May 26, 2013

Silky Smooth Curried Coconut Sweet Potato Soup

Several months ago I pinned a recipe for a soup that I thought looked very good.  And I had another look at it when I had a craving for a sweet potato and coconut dish a few days ago.  It is a good looking soup, very thick and you may want to check it out.

This soup of mine was definitely inspired by that one so I wanted to be sure to give it credit,  but I do prefer to use my own tried and true vegetable soup method, and I changed up the spices a bit, too.

I used a full fat version of canned coconut milk in this soup and it feels like silk in your mouth.  The texture is really fabulous.  I know it would be good with a light coconut milk, too, and of course the calorie count would be lower… and for my Weight Watchers friends, the P+ values would certainly be less as well.

Your choice, of course. 

Any leftovers can be frozen or just kept in the fridge for use within a couple of days.

Here is how I made it.


Curried Coconut Sweet Potato Soup


Curried Coconut Sweet Potato Soup
Makes 5 one-cup servings
  • 1 Tbs coconut oil
  • 16 oz sweet potato, peeled and cut into 1/2 inch chunks
  • 4 oz white onion, peeled and chopped
  • 3 cloves garlic, peeled, smashed and minced
  • 2 cups water
  • 1/2 tsp cumin
  • 1/2 tsp curry powder
  • 1/8 tsp red pepper flakes
  • 1/2 cup coconut milk
  1. Place the coconut oil in a large soup pot over MEDIUM heat.
  2. Saute the onions and garlic until translucent, being careful not to let them brown.
  3. Add the sweet potato chunks and saute about 5 minutes.
  4. Add the spices and stir to coat the veggies.
  5. Add the water, bring to a boil and then cover the pot, and reduce the heat to LOW and let the mixture simmer for about half an hour.
  6. Remove the pot from the heat and using your immersion blender, puree the veggies and combine with the broth. You don’t want any lumps left.
  7. Add the coconut milk to the mixture and stir or blend well.
  8. Place soup in serving bowls, and sprinkle with salt and pepper to taste.


Per serving.
Weight Watchers P+ = 5.
Calories 159; Protein 6g; Carbohydrate 25g; Fat 6g; Fibre 3g.

May 21 soup 001
Make sure your heat setting is not too high so that your garlice and onions do not brown when cooking.

May 21 soup 002
Chop the sweet potato into 1/2 inch chunks so that it cook fairly quickly.

May 21 soup 003
Still steaming when I opened the lid and started to puree.

May 21 soup 004
That’s better!  Don’t want to melt the blender!

May 21 soup 005
Almost done. You can see it it still a bit lumpy.

May 21 soup 006
And ready to enjoy!

Sunday, February 17, 2013

My Paleo Meatloaf.. Scored a Hit

We lucked into a very good buy on some extra lean ground beef recently, so I picked up a couple of packages... brought it home and then wondered what I was going to do with it.  Do you ever do that?

Well, The Captain asked for meatloaf as he hadn't had any for some time... so I quickly agreed and then had to really think about how I was going to make one that would meet the requirements of my Whole30 Paleo Challenge... in other words, I could not use any bread or cracker crumbs, or oats in the mixture.

I used a couple of tablespoons of  Homemade Balsamic Ketchup in this dish. If you are not concerned about the Whole30 aspect, use your favorite commercial ketchup, or if you do want sugar-free, then use a couple of tablespoons of tomato paste and a dash of balsamic vinegar.

I came up with a loaf that is juicy and tasty and got a thumbs up from the hungry man, so I decided it was worth sharing!   The leftovers are in the freezer and we will be enjoying it again soon.


Jan 25 meatloaf dinner 001


My Paleo Meatloaf
Makes 4 servings
  • 1 pound extra lean ground beef
  • 3/4 cup onion, chopped
  • 4 cloves garlic, peeled, smashed and minced
  • 2 large stalks celery, diced
  • 1 egg
  • 2 Tbs sugar free ketchup
  • dashes of salt and pepper
  1. Preheat oven to 350° F.
  2. Mix all ingredients together well and place in a loaf pan that has been lightly coated with a non-stick spray.
  3. Bake for one hour and then remove to cooling rack.
  4. Cut into 4 pieces to serve.
Per serving.
Weight Watchers P+ = 6.
Calories 249; Protein 26g; Carbohydrate 7g; Fat 13g; Fibre 1g.


Do you like meatloaf?

Any ideas as to what I could do with some more of the ground beef?


Thursday, December 20, 2012

Crock Pot Pulled Pork

Using my crock pot makes dinner so easy!  I can layer my ingredients in the crock pot, set it to LOW and leave it simmer all day... and the aroma coming from the kitchen teases me all day long with the promise of the wonderful evening meal to come.

This pulled pork smells just wonderful while it cooks... and the taste of the finished dish is not a bit of a disappointment.  The meat is so tender and really just falls apart when it comes out of the crock pot.

If you don't have crushed tomatoes on hand, use diced or whole, and just whizz them in your blender till pureed.  The result will be very similar to crushed tomatoes right from the can.


Crock Pot Pulled Pork
Makes 4 servings.
  • 1 small pork loin roast, about 16 to 18 ounces
  • 1/2 large white onion, vertically sliced in thin strips
  • 1 cup canned crushed tomatoes
  • 1/4 cup ketchup
  • 2 Tbs white vinegar
  • 2 Tbs brown sugar
  • 4 cloves garlic, smashed and minced
  • few red pepper flakes
  • salt and pepper to taste
  1. Coat the inside of your crock pot with a spritz of non-stick spray for easy cleanup.
  2. Spread the onion slices over the bottom of the crock pot and then place the roast on top in the centre.
  3. In a medium mixing bowl, stir together the tomatoes, ketchup, vinegar, sugar, garlic and seasonings.  Pour  the mixture over the onions and pork in the crock pot. making sure onions are covered.
  4. Set the crock pot to LOW and leave for 6 to 8 hours till pork is cooked.
  5. Turn off heat.
  6. With 2 forks, pull the roast apart and shred the meat, mixing it with the sauce.
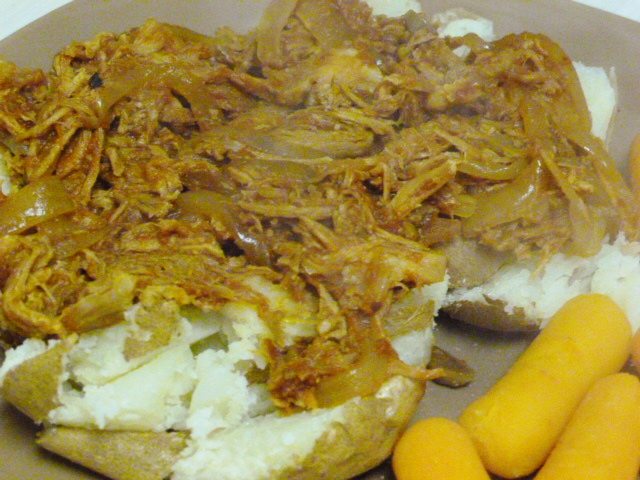
  7. Add more salt and pepper to taste, and serve over warmed rolls, rice, noodles, baked potatoes, spaghetti squash or grains of your choice.
Per serving.
Weight Watchers P+ = 6.
Calories 234; Protein 28g; Carbohydrate 13g; Fat 7g; Fibre 1g.

Cut the onion in half vertically and then slice in 1/4 inch lengths. Pkace in the bottom of the crock pot and place the pork roast on top of them.
 

Mix the sauce ingredients together and then pour over the onions and pork in the crock pot, making sure onions are coated with sauce.
 

The Captain had his on toasted whole wheat rolls.
 

I had mine on a bed of cooked spaghetti squash.
 

We both enjoyed the leftovers on top of baked potatoes.


Are you a crockpot fan?  What is your favorite way to use it?