Thursday, June 28, 2012

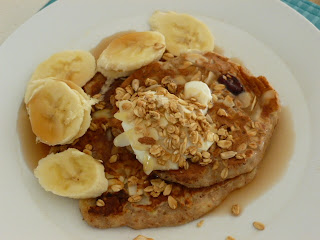
Whole Wheat Banana Crunch Pancakes via The Lean Green Bean

I saw this recipe a couple of weeks ago and made a special point of picking up some granola just to try it out.  It is very good.  But it is quite high in Points Plus Values.. so I will only be having it for a special, occasional brunch.

Well worth the 'cost' though.  I urge you to try it!

The original recipe can be found on The Lean Green Bean.  It serves 4.

You will likely have most of the ingredients in your cupboard or fridge already.  You can use any fat free plain yogurt you happen to have on hand, and that pretty much goes for the granola too.  I do suggest you use sliced almonds though... they not only are delicious, but very good for us, too!

I halved the recipe when I made it for The Captain and me.  And it was more than enough to get us through a busy Saturday morning.


Whole Wheat Banana Crunch Pancakes

Here is the N.I. as I made them:

Per serving, not including toppings.
Weight Watchers P+ =  7.
Calories 280; Proteing 11g; Carbohydrate 41g; Fat 9g; Fibre 6g.

Mixing the wet ingredients....


And the dry.

 \
Top as desired!


Monday, June 25, 2012

Cool Carrot Soup

I cannot tell you how delicious the roasted veggies taste in this soup!  You really have to try it for yourself.

This recipe comes from a Canadian publication called Fresh Juice, which we get in the mail from Presidents Choice.  It comes addressed to my husband and I am not sure how he got on their mailing list, but we have had 2 issues so far and I love them both.  Lots of great food ideas and interesting articles, too.  Free, yes, bring it on!

So... to the soup.

It is quite easy, really.  Wash, cut and roast the veggies, then allow to cool. Puree with some cold vegetable broth and serve!

I started this batch at 10:30 a.m. and we sat down to lunch at 12:30 p.m.   My vegetable broth was already cold from the refrigerator, so I skipped the 'chill' step.

You would not believe how good your kitchen will smell, too, while the carrots, onion, and garlic cloves are roasting in the oven.  I urge you to give this a try.  I used 4 cloves of garlic instead of 2 because we do love it, and I also used my own homemade vegetable stock. 

The N.I. is my own, from the exact measurements of ingredients I used.


Cool Carrot Soup
Makes 6 servings of 3/4 cup each
  • 2 lb carrots, cut in 1-inch chunks
  • 1 medium onion, cut in 1-inch chunks
  • 2 cloves garlic, peeled
  • 1 Tbs olive oil
  • Dash each of salt and pepper
  • 4 cups vegetable stock
  • Sour cream or yogurt for garnish
  • Chopped chives, fresh dill or cilantro for garnish
  1. Preheat oven to 425° F.
  2. Place carrots, onion, and garlic on a foil-lined baking sheet.  Drizzle with the oil, mix around a bit to distribute oil, then sprinkle with salt and pepper.
  3. Roast until vegetables are soft all the way through and starting to brown, 45 to 60 minutes.  Let cool slightly, about 20 minutes.
  4. Puree in blender in batches with stock until smooth.  Use more stock if you want a thinner soup.  Add more salt and pepper if you like.  Chill for about 30 minutes.
  5. Serve garnished with a dollop of fat free sour cream or fat free yogurt and a sprinkling of chopped herbs.
Per serving without garnish.
Weight Watchers P+ = 3.
Calories 100; Protein 2g; Carbohydrate 19g; Fat 3g; Fibre 5g.

Vegetables ready to pop in the hot oven.


I cooked them the whole hour and was a little concerned by the blackened bits, but used them anyway and it was fine.


Garnished and ready to eat...


With some crackers and soft cheese.  A complete lunch!  A half-portion in a small bowl would be a lovely starter course for a formal dinner.


I think when I might add some ground ginger to my next bowlful before eating it... Ginger goes really nicely with carrots.  The author of the recipe also suggests adding a light curry powder.  That would be very good too, I think.

Thursday, June 21, 2012

Peanut Butter and Mini M&Ms Blondies

Let me apologize in advance to my Weight Watchers buddies for posting about this fabulous sweet!  There is nothing WW friendly about it... brown sugar, peanut butter, butter, M&M candies... it covers the gamut of sins.


But wait... there is nothing forbidden on the Weight Watchers Points Plus program.  We just have to account for it, right?

Peanut Butter Mini M&Ms Blondies... doesn't the name just make you start to drool a little?  When I saw this recipe and the pictures on Brittany's blog, Itty Bitty Bits of Balance, I went out and bought the mini M&Ms that same day.  That was about a week ago.

But I waited until a couple of days ago to make them - why you might ask?  Well, I have gained a few pounds.  There, I said it.  It started during our half marathon training... a couple of pounds crept on, and since that race, a couple more, until I am now at the point where I weigh 11 pounds more than my lightest fighting weight.  And my resolve to get rid of it has peaked.    So I know it is safe now for me to go ahead and make these blondies for The Captain, and I will be satisfied with a taste, and can leave them alone.  If I had gone ahead and made them last week, I probably would have eaten the panful myself!

I halved the ingredients that Brittany uses in her recipe, and I  used a 8 x 8 pan.

The original recipe calls for 1-1/2 cups of mini M&M's.  1 cup of that is used in the batter and the other 1/2 cup is sprinkled over the top before baking... to keep the P+ count down, I only used the ones in the batter and didn't add any more on the top.

Therefore in halving the ingredients, I used only 1/2 cup of the mini M&Ms.

I put the ingredients I used in my Fit Day software and calculated that the N.I. for the whole thing.  It comes out at:

Calories 2752, Protein 52g; Carbohydrate 352g; Fat 129g; Fibre 15g.

That is not to scare you off, but just to give pause... and help you realize that you can cut this into as many pieces as you like to get it to the P+ values that suit you... to make it manageable for your own needs.

Let's do some math.

For each of 16 pieces:
Calories 172, Protein 3g; Carbohydrate 22g; Fat 8g; Fibre 1g.
Weight Watchers P+ = 5.

For each of 24 pieces:
Calories 115, Protein 2g; Carbohydrate 15g; Fat 5g; Fibre 1g.
Weight Watchers P+ = 3.

For each of 32 pieces:
Calories 86, Protein 2g; Carbohydrate 11g; Fat 4g; Fibre 0g.
Weight Watchers P+ = 3.

You can see with rounding, the WW calculator computes the 1/24th serving as the same number of Points Plus as the 1/32 serving... might as well eat the bigger one!


All of these are reasonable size portions... anything smaller would hardly be worth it!

Melt the butter and brown sugar over MEDIUM-LOW heat and then stir in peanut butter.  I used chunky.


Mix the dry ingredients together in a large bowl.


Add vanilla and egg to the cooled peanut butter mixture and combine... then stir it into the dry ingredients and mix well.


Add the mini M&Ms and mix well.


Spread the batter evenly in a prepared cake pan and bake about 25 minutes.  I think they would have been better if I had baked them a couple of minutes less.


Leave to cool for about half an hour.. if you can!  Then cut and enjoy!


The remainder can be frozen!  Yeah, right.

Monday, June 18, 2012

That Beautiful Berry and Chicken Salad... yeah, THAT one.

I have been seeing ads on television this week for a new salad at Wendy’s that has berries and chicken and almonds… my mouth waters whenever I see the pictures on the screen.  It looks fantastic… so I decided to make up a version and have it for dinner.

I am pretty happy with the results, especially the dressing!  We both thoroughly enjoyed it and I know I will be making this over and over, all summer long.

Here is how I put it together.


Mixed Berries and Chicken Salad With Strawberry Dressing
Makes 2 servings
  • 3 cups mixed salad greens, washed and spun dry
  • 4 ounces cooked and cubed chicken breast (I used a can of Kirkland seasoned chicken breast)
  • 2 Tbs chopped white onion
  • 10 slices of long English cucumber, slivered
  • 2 small white mushrooms, washed and sliced
  • 4 fresh strawberries, washed and sliced
  • 1 cup mixed frozen berries, thawed (mine has blueberries, blackberries and raspberries)
  • 1/2 ounce slivered almonds

Strawberry Dressing
Makes 2 servings
  • 1/2 cup fresh strawberries, washed and sliced
  • 1 Tbs white vinegar
  • 1 Tbs water
  • Dash of Stevia or Splenda, your choice
  • 2 tsp olive oil 
  1. Tear the mixed salad greens and divide between 2 serving bowls or plates.
  2. Divide the rest of the ingredients between the 2 bowls and layer on top of the greens in the order listed.
  3. Prepare the dressing by placing the strawberries, vinegar and water in a blender and puree.  Add the olive oil and combine well.
  4. Pour the dressing evenly over each of the 2 salads before serving.
Per serving, salad and dressing.
Weight Watchers P+ = 7.
Calories 276; Protein 31g; Carbohydrate 19g; Fat 10g; Fibre 7g.


Before dressing...


And after...


Enjoy!


Thursday, June 14, 2012

Quinoa Mediterranean Style

In my ongoing quest to get more protein into our diets, and more whole grains too, I have been turning to quinoa more and more lately.  It is so versatile and seems to change with the mood of the flavors I serve with it.

When I make it, I usually cook a bit extra and store it in the fridge for up to a couple of days.  I do like it cold as a salad base, and also with yogurt and fruit.

I made this recently on a warm evening for dinner. It was really tasty and filled our bellies quite nicely!  If you don't have the dried sprouted beans on hand, use about 1/2 cup of cooked beans per serving.  And, any kind of chopped onion will work.  I used red onion, but green onions would also be really good here.


Mediterranean Quinoa Salad
Makes 2 servings
  • 1/2 cup quinoa, dry measure 
  • 1-1/2 ounces sprouted beans, dry measure
  • 2 small fresh mushrooms,  sliced thin
  • 2 Tbs chopped onion
  • 2 Tbs sliced black olives
  • 1/3 medium green bell pepper, diced
  • 2 cups canned diced tomatoes
  • 2 tsp olive oil
  • 4 tsp white vinegar
  • Dashes of oregano and basil
  • Salt and pepper to taste
  1. Cook the quinoa according to package directions and allow to cool at room temperature for a few minutes, then chill in the refrigerate at least one hour.
  2. Cook the sprouted beans according to package directions, drain, and let cool at room temperature for a few minutes, then chill in the refrigerate at least one hour.
  3. To assemble the salads, place half of the quinoa and half of the sprouted beans into each of 2 serving bowls.
  4. Add half of the mushrooms, onion, black olives, bell pepper, and tomatoes to each bowl.
  5. In a small bowl, combine the olive oil with the vinegar, oregano, and basil.  Mix together well and pour half over each salad.
  6. Stir each salad to mix the ingredients, season with salt and pepper, then serve
Per serving.
Weight Watchers P+ = 8.
Calories 364; Protein 13g; Carbohydrate 64g; Fat 5g; Fibre 12g.

Start assembling ingedients by putting quinoa and sprouted beans into the bowl.


Add the mushrooms, onions, peppers, olives and tomateoes.


Mix the oil and vinegar in a small bowl with oregano and basil... if you have fresh, even better.


Pour the dressing over the salads and stir well to combine.


Season with salt and pepper, and then serve.


Monday, June 11, 2012

B is also for Broccoli

As a child I hated broccoli, among a long list of most other vegetables.  Actually, the only ones I did like were peas and corn.

My Mother, bless her heart, was a wonderful baker, but I never really liked much of the food she cooked for us on a day in day out basis.  I mostly wanted to eat her cookies and cinnamon rolls... vegetables and stews and meat and potatoes really didn't have any appeal for me.

When she cooked broccoli, it would get to that beautiful, bright green, and then she would serve it to use, limp and soggy and kinda grey, about 15 minutes later.  It was mushy.  No wonder no one liked it.  But cook it she did, because is was good for us.

Now we know that over-cooking robs veggies of their nutrients - back then we would have gotten more benefits from drinking the water the broccoli was cooked in, than eating the broccoli itself.  Broccoli is packed with Vitamin C and contains significant amounts of heart-healthy postassium.  It also boasts beta-carotene and some phytochemicals that may reduce the risk of some cancers.

Fast forward to today and I love broccoli, along with most other vegetables.  I have to admit I did learn to eat many of them raw first, and then graduated to cooked.  Broccoli was certainly one of those, and I do still prefer it raw.  I love it chopped in salads and dipped in hummus.


But when  I do cook it, I have found the key is to do it quickly!  Steam it for just a few minutes, 4 or 5 at the most.   Broccoli can also be roasted... toss it with a bit of olive oil and some salt and pepper, and roast in a hot oven for about 15 minutes... lovely!

This idea is from the Weight Watchers Points Plus cookbook called Fruits and Vegetables A-Z.  I made it for dinner recently and thoroughly enjoyed it....  I doubled the ingredients and ate it all myself!  And there was enough of the sauce left over to use as a dressing on my lunch salad the next day.

This would go really well with rice and pork or chicken for an Asian-style meal.

Steamed Broccoli with Ginger Sauce
Makes 1 serving
Weight Watchers P+ = 1

Steam the broccoli florets just until bright green and crisp-tender, about 4 minutes; transfer to small bowl.  Toss with reduced-sodium soy sauce, grated ginger,  lemon juice, and water.

I premixed the sauce ingredients together in a small bowl.


After steaming broccoli, place it in a bowl and add sauce to it. Mix well to coat all the florets.


Enjoy!

Thursday, June 07, 2012

B is For Bell Peppers

A few weeks ago I purchased a popular cookbook at my Weight Watchers meeting called Fruits & Vegetables A-Z. 


I have really been enjoying the simple and delicious recipes in it.

I love sweet bell peppers of all colors. I am always on the lookout for them and stock up whenever they are a good price.  Peppers can be stored in the refrigerator for about a week, or diced and seeded and stored frozen for up to 3 months.

They can be eaten raw, or roasted, or grilled, or even stir-fried.  Peppers become sweeter tasting with roasting.

This simple soup is one of the recipes that Weight Watchers offers in the book and we tried it for lunch recently.  It was wonderful!  The original recipe in the book is for a single serving, which would easily become 2 if used as an appetizer course.

I doubled the recipe for our lunch, and used a dash of dried basil as I had no fresh on hand.  Without giving all of the details away....


Red Pepper Soup
Makes 1 serving
Weight Watchers P+ = 3

Chop the small red bell peppers and saute in  olive oil in a small nonstick saucepan until tender.  Add  low-sodium fat-free chicken broth and some canned diced tomatoes. 

Puree in food processor.  Sprinkle with chopped fresh basil.


For 2 servings, I used 2 large red peppers.


You can cut them into fairly large chunks.


Saute in olive oil until soft, about 15 miniutes.


I like to serve veggie soups with a bit of sour cream or yogurt on top.

This soup makes up very quickly and is quite lovely... not quite as much flavor as a roasted red pepper soup, but a good substitute when you are pressed for time. 

I used my immersion blender in the saucepan, setting it in the sink in case I made a mess!  But it turned out all right... only a few small splatters to clean up.  Well worth it.

A few other great recipes that I have posted using bell peppers...


What is your favorite way to eat and enjoy bell peppers... would love to hear from you.


Monday, June 04, 2012

Bushels of Bok Choy

I had no idea, when I planted a few small bok choy plants a few weeks ago, that they would yield so much!

I have been racking my brain trying to come up with new ways to use it.  I have been cutting it up and adding it to soups, and to stir fries.  I was thinking about using it raw in salads but haven't tried that yet.

But what I did do for lunch recently, was to cut some, wash it and then blanch it, and then mix it with an Asian inspired dressing and some cashews... was a great lunch and would be a really nice side dish with some chicken or pork, I think.

You can easily adjust the ingredients to make as many servings as you would like....  I was tempted to take a piece of bread and soak up the dressing that was left in the bottom of my bowl, but I didn't... next time I make this, I will use more bok choy!


Blanched Bok Choy Toss
Makes 2 servings
  • 3 or 4 bunches bok choy, washed and separated
  • 2 tsp reduced sodium soy sauce
  • 1 tsp sesame oil
  • 1/2 Tbs rice vinegar
  • 1 Tbs canola oil
  • 1 ounce roasted salted cashews, bits or whole
  1. Bring water to a boil in a large saucepan and blanch bok choy boy plunging it into boiling water for 30 seconds.
  2. Remove it from boiling water, drain and rinse under running cold water till cooled.
  3. Pat dry and cut into pieces.
  4. Place half into each of 2 salad bowls.
  5. Mix soy sauce, sesame oil, rice vinegar and canola oil and then spoon half over bok choy pieces in salad bowl; repeat with remaing half.
  6. Mix bok choy with dressing and then top each bowl with 1/2 ounce of the cashews.
Per serving.
Weight Watchers P+ = 5.
Calories 161; Protein 4g; Carbohydrate 8g; Fat 14g; Fibre 2g.


Clean and cut the stem ends from fresh bok choy.


Plunge into boiling water for one minute to blanch.

Drain, rinse under cold water, then pat dry.


Cut and toss with dressing.  Top with cashews.


Use more bok choy if you like, or almonds instead of cashews.


If you have any ideas to help me eat this bok choy up, I would be so grateful!