Showing posts with label dessert. Show all posts

Thursday, March 30, 2017

Simple Chocolate Mug Cake

I admit to having what I like to call a latent sweet tooth.  It sorta lays in wait and does not show itself very often... thankfully... but when it does appear, it demands to be placated and satisfied almost immediately.  I have come up with a Simple Chocolate Mug Cake, using ingredients that I always have in my panty. It tastes somewhat sweet and satisfies that need.  But it is also actually very low in sugar and carbs and fat, overall, and jam-packed with protein... and flavor!  It is gluten-free, and grain-free, too.

I can pretty much whip it up in a couple of minutes and if you have a sweet tooth that needs attention, you know how important immediacy can be!  You have just got to get something sweet into your mouth as quickly as possible so it might just as well be something that is not going to break your macro/calorie/Smart Points bank, right?

The 3 main ingredients in my Simple Chocolate Mug Cake are chocolate based... chocolate whey protein powder, unsweetened cocoa powder, and chocolate PB2... and then I add almond or other unsweetened nut milk and a bit of baking powder.  I mix them together and pop into the mike for a minute. The aroma is wonderful. Gives me something to savor and anticipate while I am waiting a few seconds for it to cool enough to slide out of the baking dish and into a serving bowl.

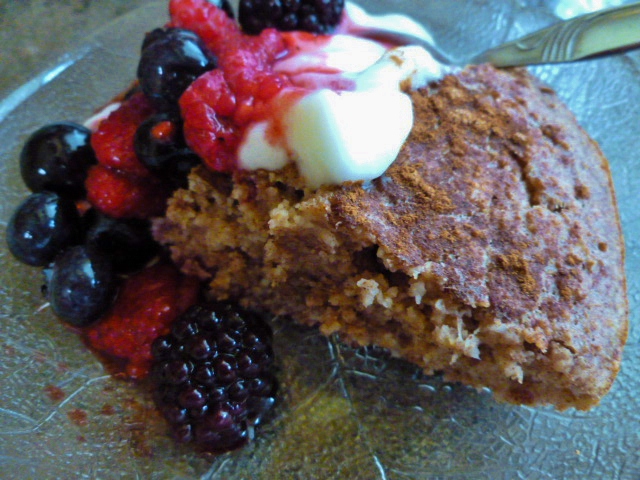
And it also gives me a bit of time to decide if I want or need toppings... yogurt, nut butter of some kind, berries, cinnamon... you know... the really good stuff.  Sometimes I just want plain chocolate cake and eat it right out of the baking dish!  It is that good.  I am thinking you could also make up an icing with protein powder or even top it with whipped coconut cream.  Mmmm.  Yep. Gotta try that!

Now, I have used a plant-based protein powder instead of whey to make this cake. And it works, but you need to cook it a bit longer for some reason.  Your choice.

I have also used a variety of nut milks, depending on what I have on hand.  I am sharing the nutritional information using unsweetened original Almond Breeze.  And if you don't have chocolate PB2, use the plain one, or failing that, use a second tablespoon of the cocoa powder. You will get an even chocolatier cake!  Is that even a word?

Okay, I did not make it in a mug... but you could!  My baking dish is a small glass bowl... about 4 inches across and about 3 inches deep.

Simple Chocolate Mug Cake


Simple Chocolate Mug Cake
makes 1 cake

Ingredients:
  • 1 scoop (about 32g) chocolate whey protein powder
  • 1 Tbs unsweetened cocoa powder
  • 1 Tbs chocolate PB2
  • 1/4 cup nut milk
  • 1/2 tsp baking powder
Instructions:
  1. Coat the inside of a microwave safe cooking dish with non-stick spray.
  2. Place the dry ingredients in a small mixing bowl and stir to combine.
  3. Add the nut milk and stir.  You want a brownie batter consistency so if it is a bit thick, add more nut milk a couple of drops at a time.
  4. Spoon batter into prepared baking dish.
  5. Cook in microwave oven for 1 minute on HIGH. Time may vary slightly.
  6. Remove cooked cake from microwave and allow to cool about 30 seconds before removing cake to serving dish.
  7. Top as desired or eat plain.
Per serving, without toppings.
Weight Watchers Smart Points = 3.
Calories 166
Fat 4g
Saturated Fat 1g
Carbohydrates 8g
Sugar 3g
Protein 28g

Printable Recipe

Simple Chocolate Mug Cake
Dry ingredients before mixing together.  See the difference in color of my 3 chocolatey ingredients and then the baking powder?

Simple Chocolate Mug Cake
Thick brownie-like batter after stirring in nut milk.  Not runny at all but very moist.

Simple Chocolate Mug Cake
Cooked cake, cooling a bit before placing in serving dish.

Simple Chocolate Mug Cake
With yogurt and berries.

Simple Chocolate Mug Cake
With yogurt and a drizzle of sugar free chocolate mint syrup.

Simple Chocolate Mug Cake
Whether you dress it up or enjoy it plain, you are sure to love this easy peasy chocolate cake!


Do you have a sweet tooth?  How do you satisfy it quickly?

Tuesday, December 30, 2014

My 5 Most Popular Recipes of 2014

It is fun for me to look back at the recipes I have posted this year and see which ones were the most popular… which ones got the most attention.  And, not surprisingly at all, they are some of my most favorite new recipes as well.  All of them are gluten free... some are Paleo, some are vegan.  Have a look... I know you will find something you really like, too.

Here are the 5 recipes and dishes that seem to be the favorites with my readers this past year.  If you click on the image, you will be redirected to the original blog post and recipe.

1.  Roasted Red Pepper and Carrot Soup


Roasted Red Pepper and Carrot Soup
This one has vegan options.  A delicious and rich hearty soup. I love the smoky flavor  of roasted red peppers.

2. Pumpkin Protein Pancakes

Pumpkin Protein Pancakes
These happen to be vegan.  Lovely!

3. High Protein Breakfast Puff

High Protein Breakfast Puff
This continues to be one of my breakfast staples.  Change up the fruit and it is different every time!  It only takes about 5 minutes to put together.

4. Low Carb Flatbread

Low-Carb Flatbread
Another of my own favorites. I put these together and freeze them whenever I find a good buy on nice large heads of cauliflower. They are gluten free and a great texture.  They do take a bit of work but so worth it!

5. High Protein Angel Food Cake

High Protein Angel Food Cake
No surprise that this remains to be so popular. Who doesn’t like a little sweet now and then? And this one is not sugar-laden at all.  Add a bit of fruit and some yogurt or whipped coconut milk and you have a very special dessert.  Mmmmm.

Thanks to all of your for your continued support and readership… I hope to bring you lots of fun recipes and food finds in 2015.

What is your favorite new recipe from 2014?


Thursday, July 05, 2012

Gluten-Free Almond Flour Banana Loaf

I have been dipping my toes into the world of gluten-free and wheat-free and trying some recipes using almond flour, or almond meal.  This gluten-free almond flour banana loaf is my first attenmpt at altering a given recipe, and it is baking in the oven, smelling wonderful as I type this post.

I have been experimenting with eliminating wheat from my diet this past week.... after reading a book called WHEAT BELLY, written by a cardiologist named William Davis, that really spoke to me.  I won't go into all the details but there was enough of  'me' in that book to give up wheat, at least on a trial basis.

I have been looking at wheat-free and gluten-free recipes on the internet and today went searching for a banana bread recipe.  I found some ripe bananas on sale this morning at a local market for 39 cents a pound and couldn't resist buying a few.

The banana bread recipe I found is on a blog called Comfy Belly.  I read through the ingredients, and found that I had most of them in my cupboard, or good substitutions.  And, I read all the reviews, too.  Do you do that when you are thinking of trying a new or unusual recipe?  I always like to see what other people have to say about it... which is why it is so nice for you to comment on my recipes if you have tried them.

Anyway, I didn't want the sugar in the syrup it called for, and I wanted a bit less fat... so I am going to give you the recipe as I made it up, but do check out Comfy Belly.  There are lots of great ideas there and it is nicely organized and presented, too.


Gluten-Free Almond-Flour Banana Loaf
  • 2 Tbs sugar free syrup
  • 2 Tbs coconut oil, melted
  • 2 eggs
  • 2 ripe bananas, mashed
  • 2-1/2 cups almond flour
  • dash of salt
  • 1/2 tsp baking soda
  • 1/2 cup dark chocolate chips
  1. Preheat the oven to 310° F.
  2. Line a loaf pan with parchment paper and coat with non-stick spray.
  3. Peel the bananas and mash them in a large bowl.
  4. Add the eggs to the bananas and beat with a spoon till frothy.
  5. Add the syrup and oil to the banana mixture and stir till combined.
  6. Mix the almond flour, salt, and baking soda together in another large bowl. Set aside a few of the chocolate chips for topping and then stir the remainder into the dry ingredients.
  7. Pour the wet ingredients into the dry and mix well.
  8. Pour the batter into the prepared loaf pan and spread it evenly.
  9. Then sprinkle the reserved chocolated chips over the top.
  10. Bake for 45 minutes or until a toothpick inserted in the centre comes out clean.
  11. Let cool in pan for a bout 20 minutes, then turn out and let cool completely before slicing.
The whole recipe has an intimidating N.I. when viewed with the eye of a Weight Watcher:
2181 Calories; Protein 75g; Carbohydrate 113g; Fat 179g; Fibre 35g.  That is a whopping 62 P+!

But, taking a deep breath, I realize that the number of P+ per serving is going to depend upon how many slices are cut.

Here are a couple examples to guide you.

Each of 16 slices:
136 Calories; Protein 5g; Carbohydrate 7g; Fat 11g; Fibre 2g.
WW P+ = 4.

Each of 12 slices:
182 Calories; Protein 6g; Carbohydrate 9g; Fat 15g; Fibre 3g.
WW P+ = 5.

So it is up to me and to you as to how many P+ we need to budget for this treat.

After taking the loaf out of the oven and letting it rest in its pan for the full 20 minutes... I had to go for a little walk... I lifted the edges of the parchment paper and it came right out of the pan.  What a good idea that is...  and after cutting it in half and then those in half again, I realized that 1/16th would be a generous treat. 

Naturally I shared with The Captain and we both ended up eating 2 of them each while they were still warm.  Lovely!  And no sugary 'let's eat the whole thing' cravings ensued.  Hurray!

The rest went into the freezer for another day... but you can bet I will be making this again and doing some more tinkering with the recipe and ingredients to add berries and perhaps some nuts.

Mash bananas in a large bowl.


Add eggs and beat till frothy, then add the rest of the wet inredients and mix well.


Combine the dry ingredients, setting aside a few chocolate chips for the top.


Pour the wet ingredients into the dry and mix well.


Place batter into prepared loaf pan and sprinkle the reserved chocolate chips over the top.


Bake for 45 minutes... the kitchen smelled wonderful!


Let the loaf rest for 20 minutes in the pan, then remove to cooling rack and allow to cool a bit longer to make it easier to slice... if you can wait!


It is soft and crumbly and a bit hard to slice while still warm.


I like the outside edge the best!  I am a big crust fan.  So tasty, but not too sweet.


Printable Recipe

Have you baked with almond flour or almond meal?  Any good tips or ideas to pass along?

Thursday, June 21, 2012

Peanut Butter and Mini M&Ms Blondies

Let me apologize in advance to my Weight Watchers buddies for posting about this fabulous sweet!  There is nothing WW friendly about it... brown sugar, peanut butter, butter, M&M candies... it covers the gamut of sins.


But wait... there is nothing forbidden on the Weight Watchers Points Plus program.  We just have to account for it, right?

Peanut Butter Mini M&Ms Blondies... doesn't the name just make you start to drool a little?  When I saw this recipe and the pictures on Brittany's blog, Itty Bitty Bits of Balance, I went out and bought the mini M&Ms that same day.  That was about a week ago.

But I waited until a couple of days ago to make them - why you might ask?  Well, I have gained a few pounds.  There, I said it.  It started during our half marathon training... a couple of pounds crept on, and since that race, a couple more, until I am now at the point where I weigh 11 pounds more than my lightest fighting weight.  And my resolve to get rid of it has peaked.    So I know it is safe now for me to go ahead and make these blondies for The Captain, and I will be satisfied with a taste, and can leave them alone.  If I had gone ahead and made them last week, I probably would have eaten the panful myself!

I halved the ingredients that Brittany uses in her recipe, and I  used a 8 x 8 pan.

The original recipe calls for 1-1/2 cups of mini M&M's.  1 cup of that is used in the batter and the other 1/2 cup is sprinkled over the top before baking... to keep the P+ count down, I only used the ones in the batter and didn't add any more on the top.

Therefore in halving the ingredients, I used only 1/2 cup of the mini M&Ms.

I put the ingredients I used in my Fit Day software and calculated that the N.I. for the whole thing.  It comes out at:

Calories 2752, Protein 52g; Carbohydrate 352g; Fat 129g; Fibre 15g.

That is not to scare you off, but just to give pause... and help you realize that you can cut this into as many pieces as you like to get it to the P+ values that suit you... to make it manageable for your own needs.

Let's do some math.

For each of 16 pieces:
Calories 172, Protein 3g; Carbohydrate 22g; Fat 8g; Fibre 1g.
Weight Watchers P+ = 5.

For each of 24 pieces:
Calories 115, Protein 2g; Carbohydrate 15g; Fat 5g; Fibre 1g.
Weight Watchers P+ = 3.

For each of 32 pieces:
Calories 86, Protein 2g; Carbohydrate 11g; Fat 4g; Fibre 0g.
Weight Watchers P+ = 3.

You can see with rounding, the WW calculator computes the 1/24th serving as the same number of Points Plus as the 1/32 serving... might as well eat the bigger one!


All of these are reasonable size portions... anything smaller would hardly be worth it!

Melt the butter and brown sugar over MEDIUM-LOW heat and then stir in peanut butter.  I used chunky.


Mix the dry ingredients together in a large bowl.


Add vanilla and egg to the cooled peanut butter mixture and combine... then stir it into the dry ingredients and mix well.


Add the mini M&Ms and mix well.


Spread the batter evenly in a prepared cake pan and bake about 25 minutes.  I think they would have been better if I had baked them a couple of minutes less.


Leave to cool for about half an hour.. if you can!  Then cut and enjoy!


The remainder can be frozen!  Yeah, right.

Friday, May 11, 2012

Cinnamon Bun Protein Cake, Sugar/Wheat Free

I came across this recipe a few weeks ago and meant to make it right away... not sure what happened to get in the way of that.  But I did make it earlier this week, finally, and I am so glad that I did.  I will be making it again and again!

We will be running our first half marathon on Sunday, May 13th, and this week, leading up to it, I wanted to make sure we are eating healthy snacks and desserts.

To make the ground oats, I pureed quick oats in the blender and that worked very nicely.  I also used vanilla flavored Almond Breeze, and vanilla flavored fat free yogurt in the mix.  I also used an unsweetend vanilla protein powder.  Sounds like a lot of vanilla, but it was fine!  Actually, I might add a dash of vanilla to the mix if all the ingredients were plain!

It smelled so good while it baking and when  it came out of the oven it was hard to wait for it to cool a bit before slicing it and digging in!

I checked with Kris, who blogs at I Heart Wellness, and she gave me permission to share the recipe with you here. I hope you will give it a try... I will be checking out some of Kris's other great ideas soon!


Cinnamon Bun Protein Cake
  • 6 packs Stevia
  • 3-1/2 Tbs (1 scoop) vanilla protein powder
  • 1-1/2 cups ground oats
  • 1 Tbs baking powder
  • 1/4 tsp sea salt
  • 2 tsp cinnamon
  • 2 eggs
  • 1 cup almond milk
  • 3 Tbs plain greek yogurt
  • and topped it off with 2 tsp cinnamon and 1 tsp powdered Stevia mixed together
  1. Preheat oven to 350° F.
  2. Mix all ingredients together in a large mixing bowl and whisk together! 
  3. Sprinkle the extra cinnnamon and Stevia over the top of the batter.
  4. Bake for 30 minutes in a pan coated with a non-stick spray. 
I decided to cut the cake into 8 wedges, and will share the N.I. as I made it:

Per serving of 1/8th of whole cake.
Weight Watchers P+ = 3.
Calories 96; Protein 7g; Carbohydrate 12g; Fat 3g; Fibre 2g.

Mix the oat flour, baking powder, Stevia, cinnamon, and protein powder together in a large bowl. 

Mix the Almond Breeze with eggs and yogurt.


In a small bowl, mix cinnamon and Stevia together for topping. 

Stir the wet ingredients into the dry and mix well. 

Pour the batter into a prepared pan and sprinkle the cinnamon/Stevia mixture over the top before putting into preheated oven.


I baked this cake for 30 minutes and then let it cool a few minutes before cutting it into 8 wedges. 

Serve with yogurt and fruit for dessert... 

or breakfast, or just a snack.

Thursday, April 26, 2012

Low Calorie Lemon Bars

I came across these lemon bars a couple of years ago on a blog called Cooking Done Light, bookmarked the recipe, and then completely forgot about it.  I found it today when I was looking for something lemony to make for The Captain.  He has been doing lots of little things for me lately and I wanted to make him something new and lemony to say Thank You.  Lemon is his favorite flavor, and I think caramel is a close second.

This lemon bar recipe did the trick... as soon as I started to zest the lemons, he commented on how good that smelled, so I knew he would be happy with the results.  And he was.  Win win.  Gotta love that.

I never have pastry flour on hand, so I just used whole wheat flour and hoped for the best.  And the two small lemons I had didn't yield  the 2 Tbs of zest that the original recipe calls for so I just used what they gave me.... but when I squeezed the juice from them, I did make sure to include some of the pulp too. I think it enhanced the flavor.  I squeezed the lemons into a 1/3 cup measure and then just topped it off from a bottle of lemon juice from concentrate.

Here is how I made them.  And I calculated my own Nutrition Information as the numbers given in the blog post just didn't make sense to me (unfortunately as they are about half of what I came up with).

I hope you will give them a try.


Low Calorie Lemon Bars
Makes 12 servings
  • 1/4 cup icing sugar
  • 3 tablespoons butter, softened
  • 1/2 cup whole wheat flour
  • 3 eggs
  • 3/4 cup white sugar
  • 2 tablespoons freshly grated lemon zest
  • 1/3 cup lemon juice
  • 3 tablespoons all-purpose flour
  • 1/2 teaspoon baking powder
  • Dash of salt
  • Dash of additional icing sugar, for dusting
  1. Preheat the oven to 350° F and and lightly coat the bottom of an 8 inch square baking pan with nonstick spray.
  2. Beat the 1/4 cup of icing sugar and butter on medium speed until creamy.
  3. Gradually add the 1/2 cup of whole wheat flour and mix on low speed until the mixture is crumbly. Make sure not to overmix.
  4. Press the mixture into the bottom of the prepared pan and bake until just golden brown, about 10 to 12 minutes.
  5. Remove from the oven and cool on a wire rack and lower the oven temperature to 325° F.
  6. While the oven temperature reduces, whisk the eggs on medium speed until foamy.
  7. Add the white sugar, lemon zest, lemon juice, 3 tablespoons of all purpose flour, baking powder and salt and whisk until combined.
  8. Pour the mixture over the baked crust and return to the oven until “set”, about 20 to 25 minutes.
  9. Do not touch the filling with your fingers or it will stick to them and you will have a big dent in your bars!  
  10. Cool completely (about an hour at least) on a wire rack, then cut into 12 squares and dust with icing sugar.
Per serving.
Weight Watchers P+ = 4.
Calories 136 calories; Protein 2g; Carbohydrate 22g; Fat  4g; Fibre 0g.

Mix butter and icing sugar together...


until creamy and light.


Add whole wheat flour a bit at a time and mix until crumbly.  Don't overmix.


With your fingers or the back of a spoon, press the mixture into prepared baking pan.


Remove from oven after is is golden brown, about 10 to 12 minutes.


While crust and oven are cooling, beat eggs till frothy, the mix in the white sugar, lemon zest, lemon juice, all purpose flour, baking powder, and salt.


Pour over the crust and bake for 20 to 25 minutes until it is 'set'.


Remove from oven and place on a cooling rack.


Allow to completely cool before trying to slice... Don't touch it!  It takes about an hour to cool enough to cut.  You can hold your hand above it, and when you no longer feel heat, it will be all right to cut.


It shrinks and cracks a bit when it is cool.  Sprinkle with icing sugar and cut into 12 pieces.


Just barely cooled.


A lovely, creamy, lemony filling on a light crust.


The Captain asked for a double slice!